Managing Permissions

The default Mediawiki installed has been customized to make it a bit harder for spammers to overwhelm wikis with illegitimate content and comments. This is done by modifying the LocalSettings.php file (a file that is included in every install in which it is possible to provide configurations details).

By default, Mediawiki allows anonymous users to create pages and edit pages in the wiki. The modifications change this in the following ways:

  • Anonymous users cannot edit existing pages
  • Anonymous users cannot create pages
  • Registered users must click the confirmation link in the registration email in order to edit or create pages

This approach should drastically reduce unsolicited content and comments on Mediawiki installations. One further step that administrator might take is to turn registration off after a predetermined amount of time. Users must create accounts by this date; after that, the settings are changed so that registrations are no longer open.

To add this setting, you must edit LocalSettings.php in your Mediawiki install:

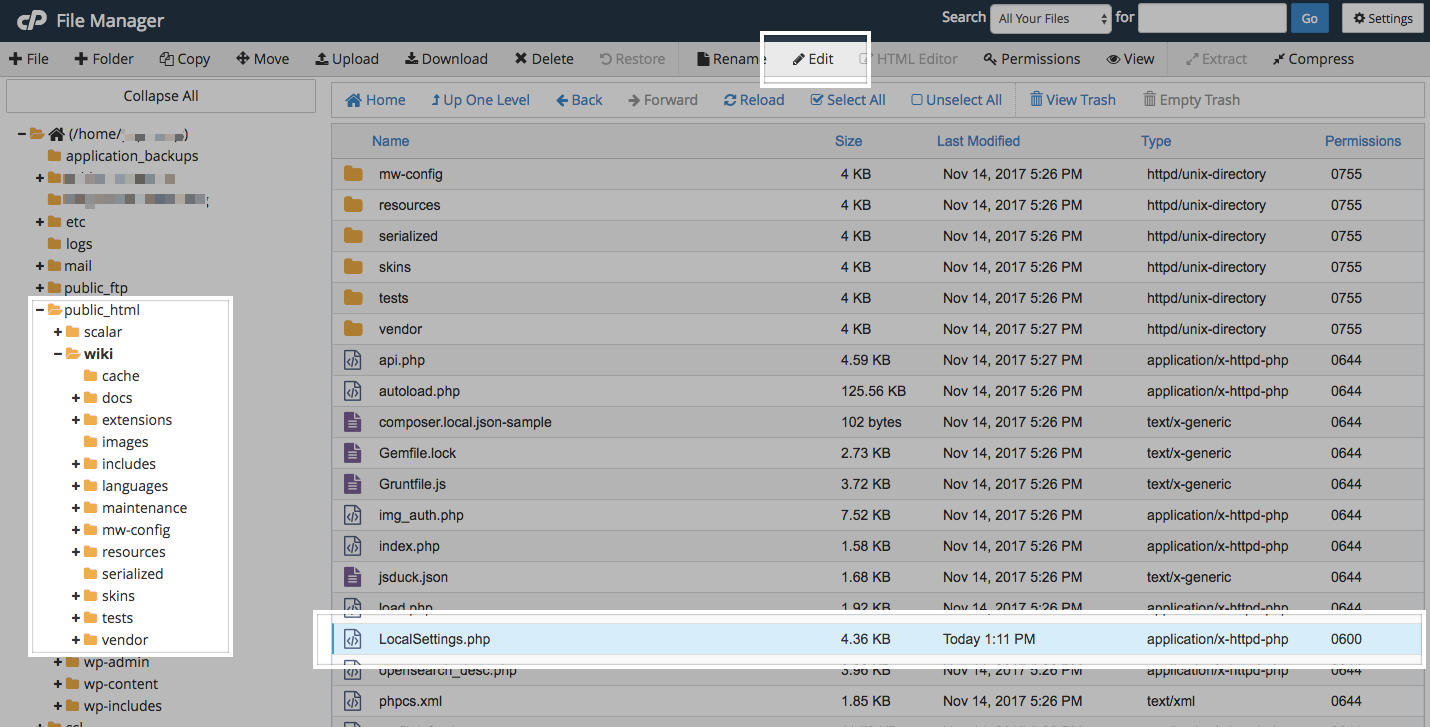
  1. Login to cPanel and browse to your File Manager.
  2. In the File Manager, browse to the folder within public_html that contains your Mediawiki install. If you installed the wiki at the root of your domain, you won’t need to go any further than public_html. If you installed the wiki in a subdomain or subdirectory, you’ll need to find the directory that is associated with that space.
  3. Locate LocalSettings.php. Once selecting the file, click download in the top menu bar to download the file as a backup before proceeding. Then click Edit in the top menu bar to edit the file.
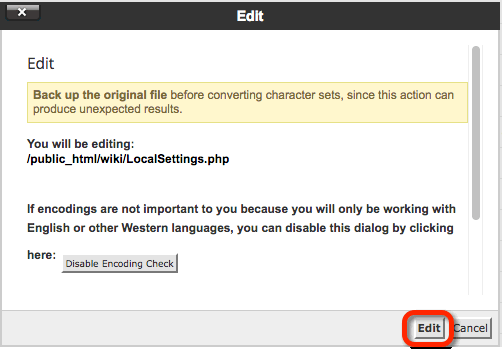
  4.  Confirm that you want to edit the file.
    Confirm that you want to edit the file
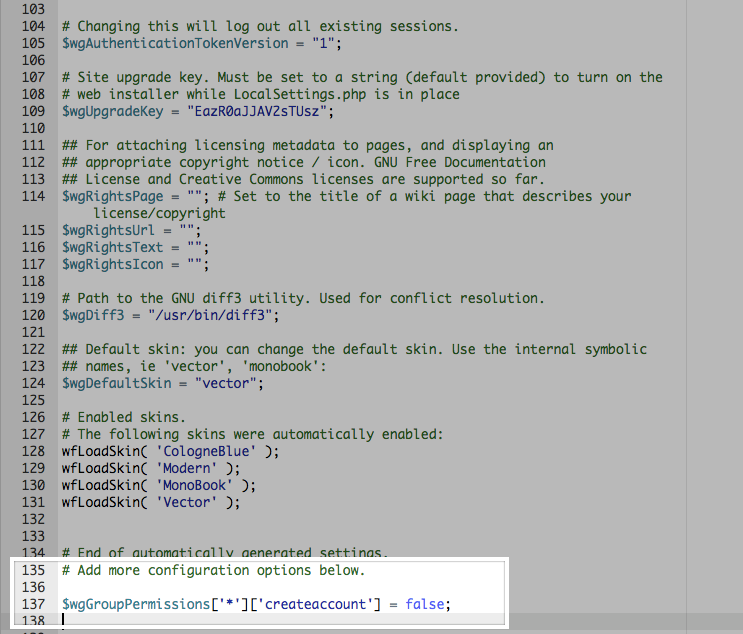
  5. Browse to the bottom of the document, and locate the custom settings that were added during the Mediawiki install and the following line:
$wgGroupPermissions['*']['createaccount'] = false;

Installing Mediawiki

  1. To get started you’ll need to login to your control panel (https://sites.dtcc.edu/dashboard) using your Delaware Technical Community College username and password.
  2. Once logged in you’ll be at the homepage of your control panel. Navigate the Applications section of the cPanel and click All Applications.
  3. Find and select MediaWiki.
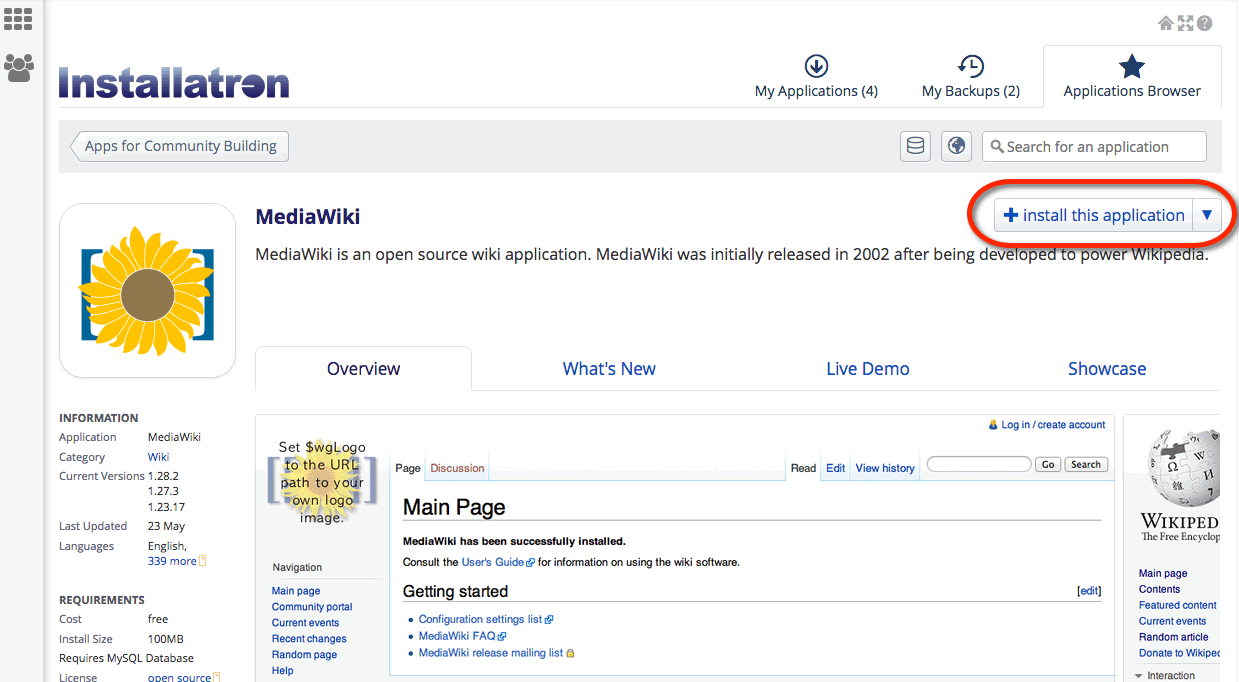
  4. The next page gives you more information about the MediaWiki software. To begin the install, click install this application in the upper-righthand corner.
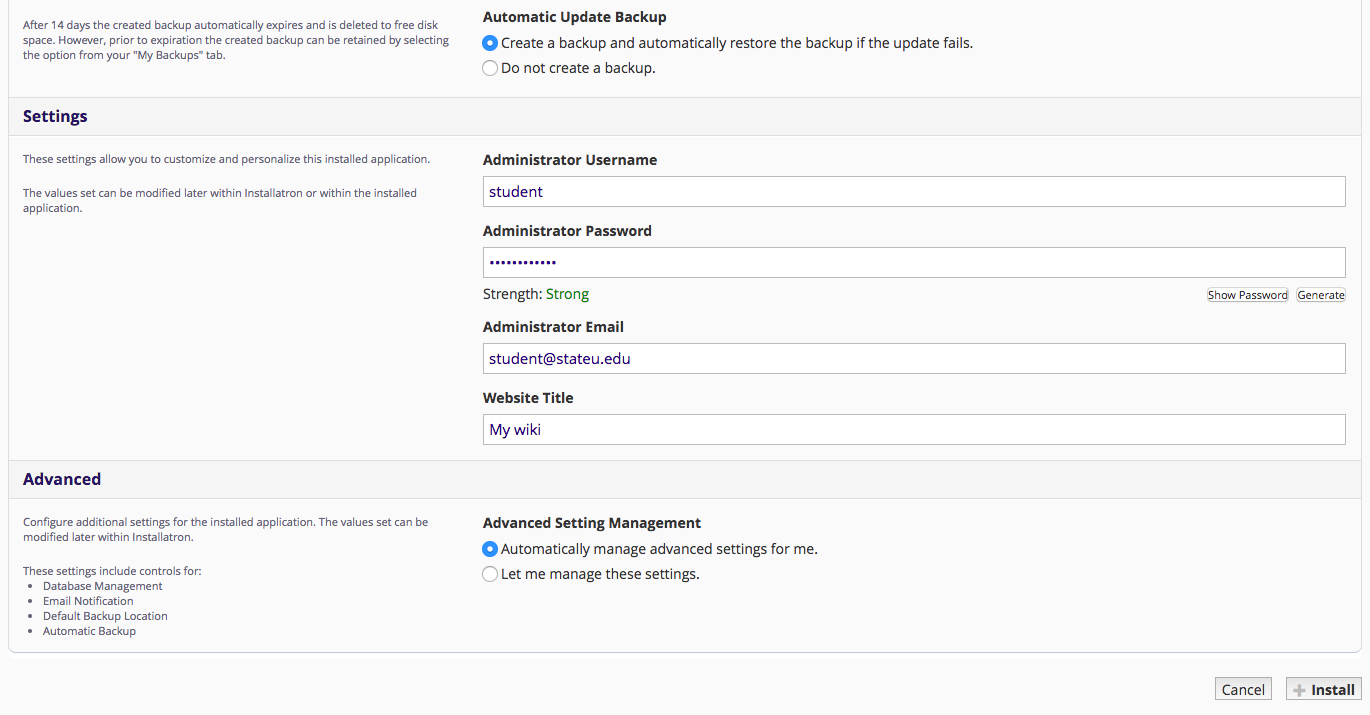
  5. On the next page, the installer will ask for some information about this install. The first thing you’ll want to do is decide where to install it. If you’re wanting to install MediaWiki on your main (the root) domain, you can leave the directory area empty. If you created a subdomain, you can select it from the drop-down menu. You also have the option of installing MediaWiki in a subfolder by typing in the folder name in the Directory field. Click here for more information about subdomains and subfolders.

    (By default the installer will automatically backup your MediaWiki website and update it anytime a new version comes out. While we recommend you keep this option, it is possible to only do minor updates, or turn them off completely. The installer will also create a database for you automatically, but if you’ve already created one for this website you can choose Let me manage the database settings and enter the details.)
  6. Finally, you’ll need to create an initial username and password for the MediaWiki install. Enter those credentials in the Settings section and click Install.
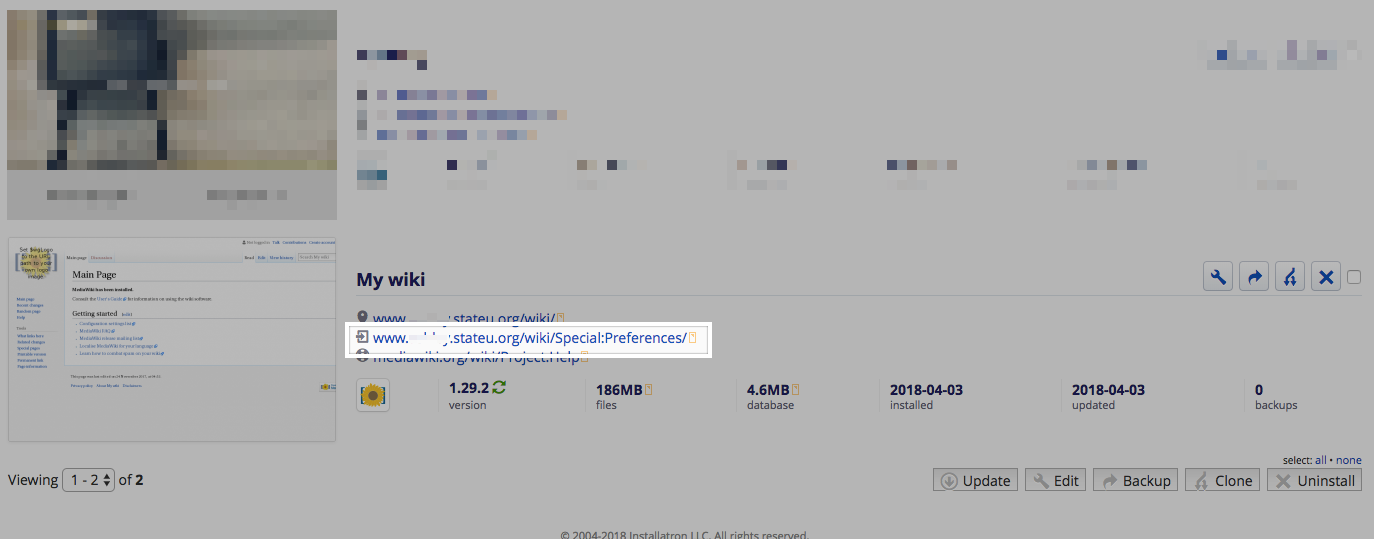
  7. The installer will take just a few moments to install MediaWiki and a progress bar will keep you updated. When it is complete you will see a link to your new MediaWiki site as well as a link to the back-end administrative section for your MediaWiki site.

Congratulations, you have now completed the installation of MediaWiki! You can now start to create collaborative documents on your own domain.

Grav

Grav is a content management system (CMS) or, said another way, it’s an application to make websites. But differs from other CMSs like Drupal or WordPress in its underlying technology. While it’s a PHP app like those two, unlike them it does not have a database. All data is written directly to files rather than stored and retrieved from a database. This is known as a flat-file system and it can help with performance given numerous database calls can slow down sites.

Why and when would you use Grav? Grav should maybe be reserved for the technically-savvy user. It’s not that Grav is particularly difficult (every CMS has a learning curve) but rather it gets really interesting when you can integrate it into Github using the Github Sync plugin, which syncs everything on your Grav site to a Github repository for others to contribute to, clone, or fork. Grav also requires a familiarity with Markdown, a lightweight Markup language, so that’s something to be aware of as well.

You can learn more about Grav here.

Installing Grav

  1. Log into your cPanel:
  2. Navigate to Files > All Applications:
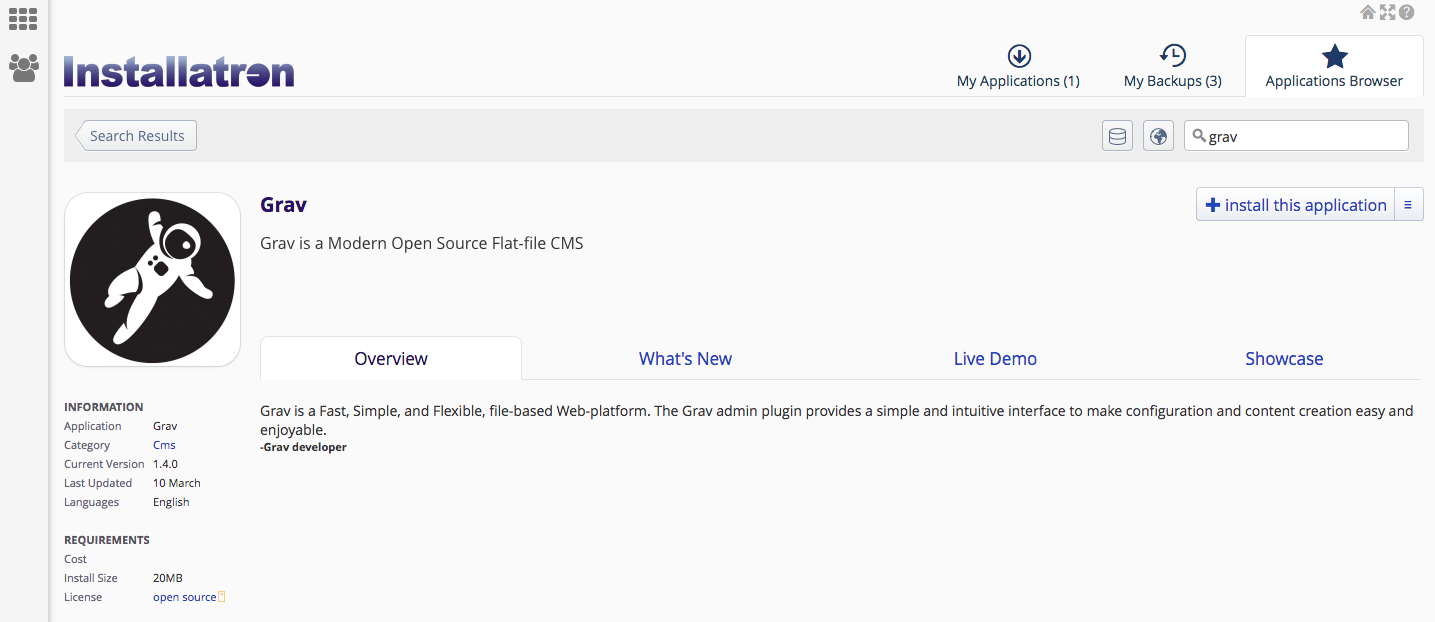
  3. Type Grav in the top right search bar and press Enter. Click Install this Application.
  4. Choose where you would like the domain to live. If you need further assistance on this section, read through our guide on Subdomains Vs. Subdirectories. You’ll also want to choose the latest software version, accept the license agreement, and choose your update preferences.
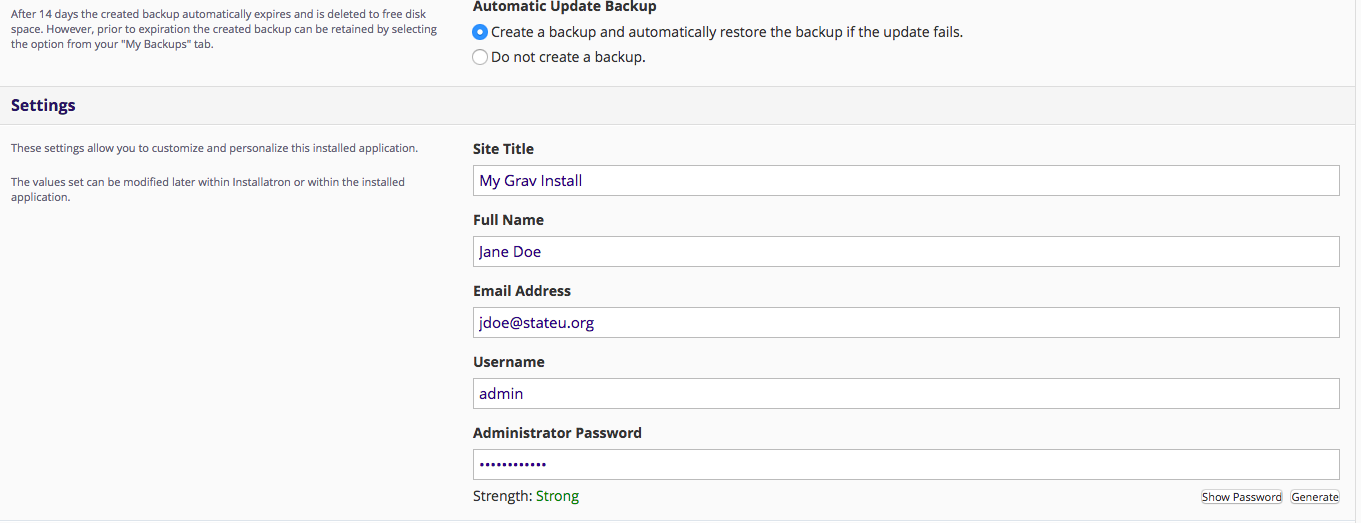
  5. Scroll down. Choose your Backup preferences. In the Settings section, name your Grav install, type in your contact details and create a username & password. Make sure that you’ve copied and pasted these credentials elsewhere, as you’ll need them later.
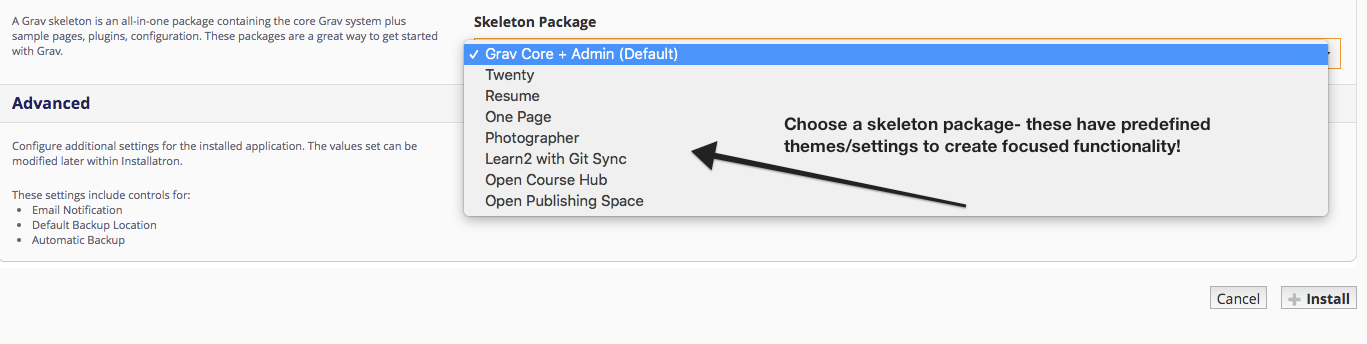
  6. Scroll down. Here you’ll have the option to install an empty version of the tool (i.e. a blank slate) or you can install a predefined package with themes/settings already customized for you. You’ll still be able to change settings in a predefined package, but it at least gives you a starting point. When you’re ready, click Install.
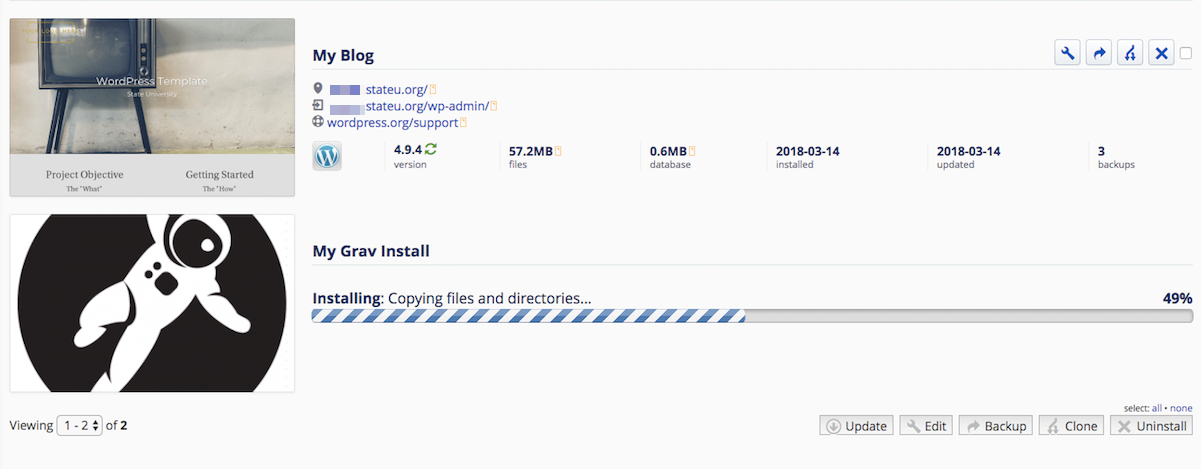
  7. You’ll now be redirected to a window where Grav will install.
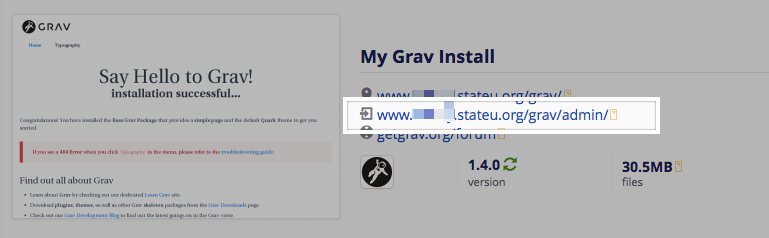
  8. Once the install has completed, click on the middle admin link to log into your new Grav instance:
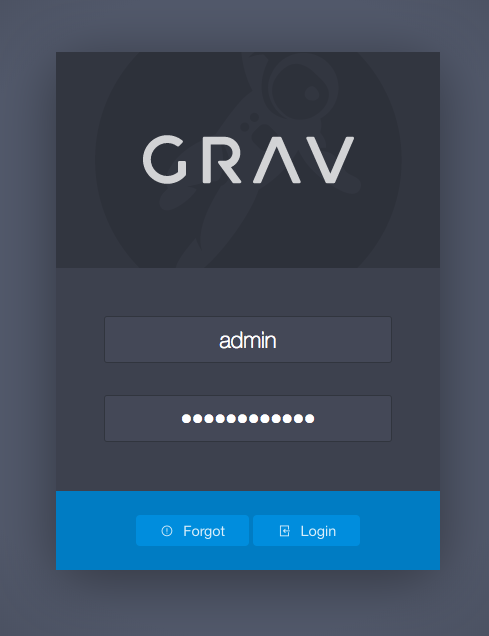
  9. Type the credentials that you set during the install process, and click Login.

Working with Grav

You can find tutorials for working with Grav here.

Widgets

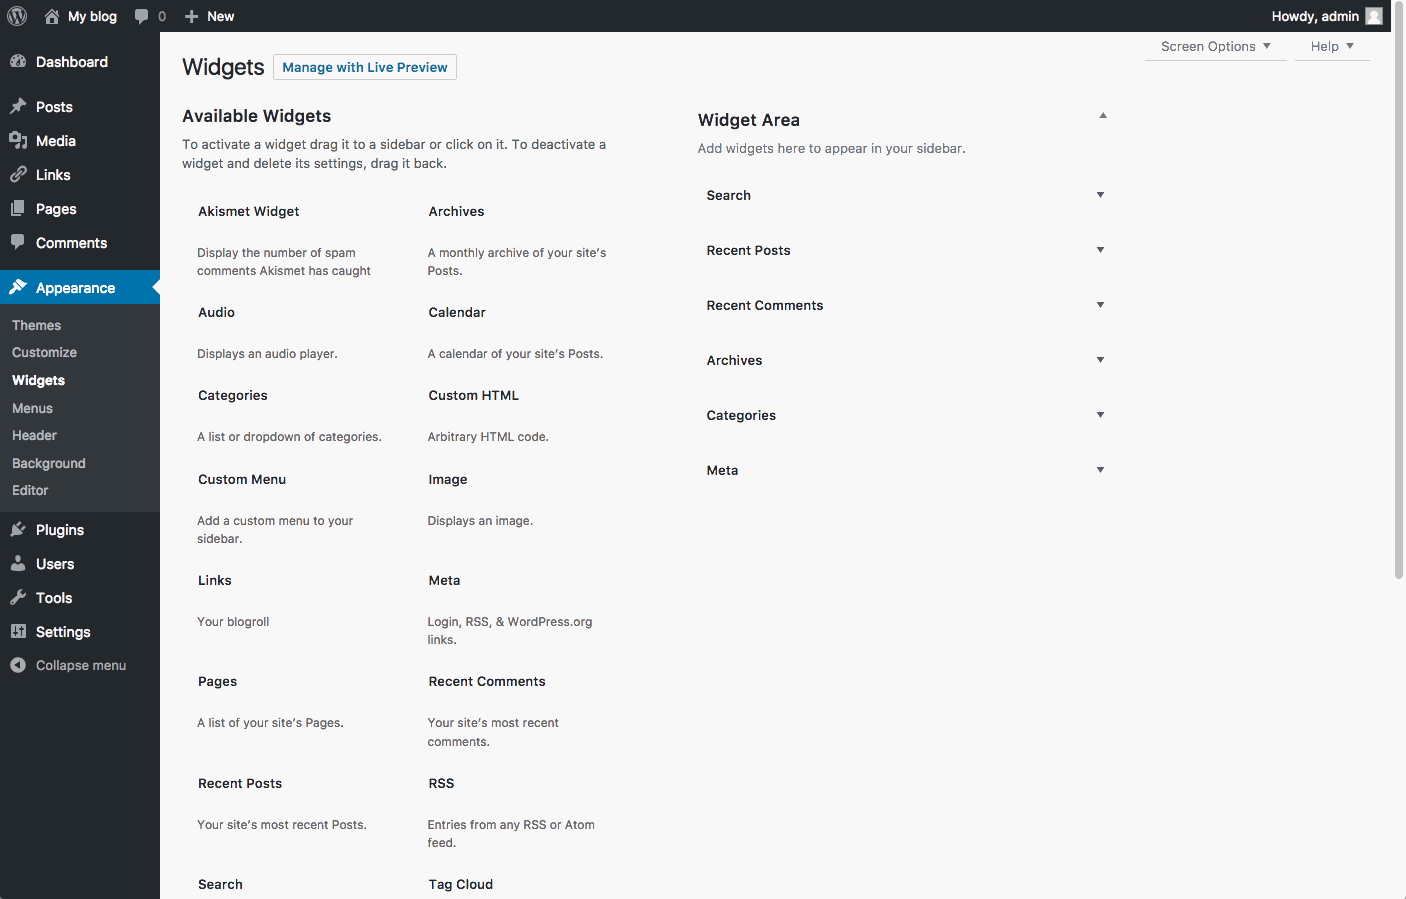
Widgets are a more advanced feature of WordPress that allow you even more control over the content on your site. In essence, widgets are small containers of content that can be placed in various areas of your site. Where you can place widgets depends entirely on the theme you are using. Many (most) themes include at least one “sidebar” into which you can place widgets. Some themes include additional “widgetized” areas. The best way to find out what areas are available to you is to go to Appearance > Widgets and take a look at the areas listed on the right. Each widgetized area will appear as a box on the right. In the example shown below, the theme contains three widgetized areas: Primary Sidebar, Content Sidebar, and Footer Widget Area.

screen shot of widgets

On the right, you will see a number of widgets available to you. WordPress comes with some default widgets. Other widgets might become available when you have a particular theme activated. Finally, some plugins provide additional widgets to you.

Widgets can present all different kinds of information. The simplest widgets allow you to add text to your site. But you’ll also find widgets with many options that you can set to display dynamic content or to interact with other services. Below is a list of the default widgets available in WordPress.

When you’re ready to start using widgets, all you need to do is drag them from the right-hand side of the Widgets interface into the boxes on the left. WordPress will immediately save them, but you may need to set some options

Default Widgets

  • Archives: Shows a monthly listing of your posts.

    • Calendar: Shows a calendar view of your posts.
    • Categories: Shows a list of all of the categories on your site.
    • Custom Menu: Shows a custom menu that you’ve set up with WordPress’ Custom Menu interface.
    • Links: Shows your links.
    • Meta: Shows links to your RSS feed and your login.
    • Pages: Shows a menu of all of your pages.
    • Recent Comments: Shows the most recent comments on your posts.
    • Recent Posts: Shows your most recent posts.
    • RSS: Allows you to show content from an RSS feed.
    • Search: Provides your users with a search box.
    • Tag Cloud: Shows a “cloud” of the tags/categories on your site.
    • Text: Shows whatever text you enter.

Neatline Plugin

Building an interactive map using Omeka’s Neatline plugin

Neatline is a plugin for Omeka that allows for the creation of interactive maps and timelines. Neatline allows the user to plot points on geospatial layers that, when clicked, reveal text and media. Users may create records from scratch and add them to their Neatline exhibits, or import existing items from Omeka. See Neatline.org for demos of this tool in action and more documentation.

Before using this tool, you’ll need to install the Neatline plugin to Omeka. If you’ve already installed the Escher plugin, you can use it to install Neatline. If not, follow the instructions on the “Installing Plugins” section of this support page.

Vocabulary

Item: Omeka’s basic building block, containing text, media, and/or metadata.
Collection: A group of items, typically sharing a common theme.
Record: Neatline’s version of items. Can be created on their own, or imported from an existing item in Omeka.
Exhibit: A Neatline map or timeline; contains your records.
Widget: An add-on tool for Neatline, such as Waypoints.
Spatial layer: A navigable map that Neatline can use, typically pulled from Google Maps. The various options Neatline offers have different aesthetics.

Setting up (first time only)

1. Install the Neatline plugin (see above). Install any additional supporting plugins you’d like, such as Neatline Waypoints.

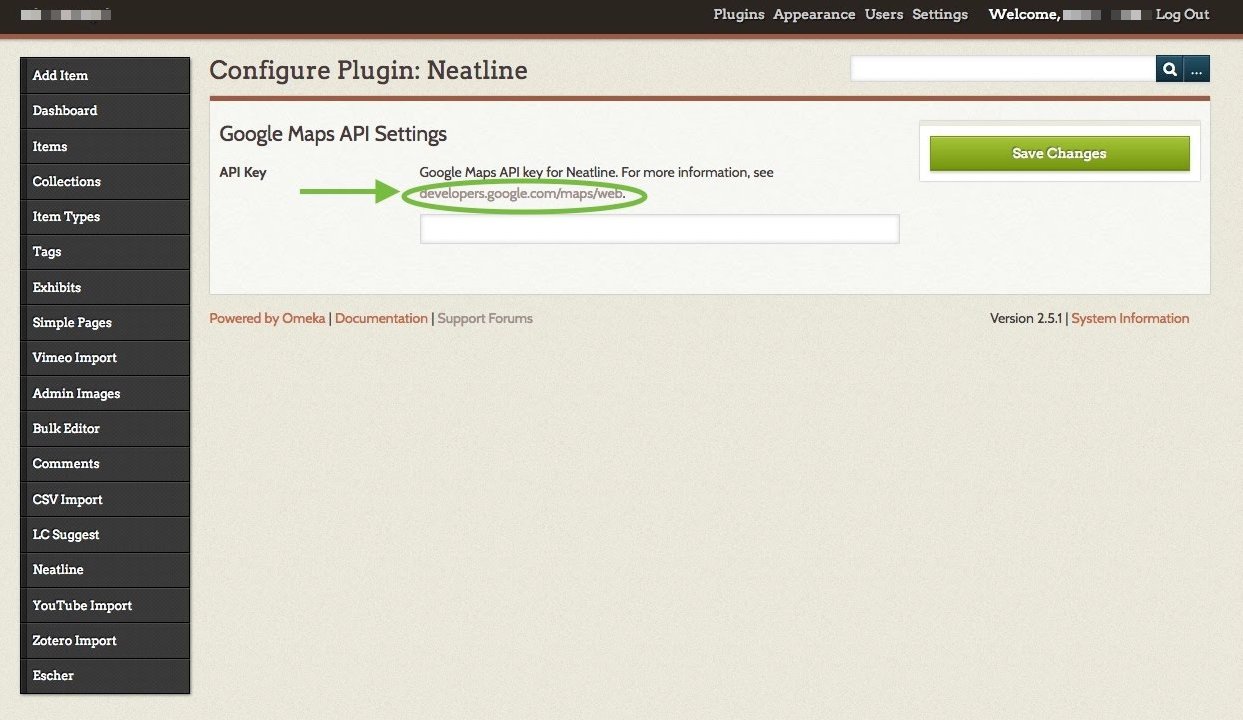
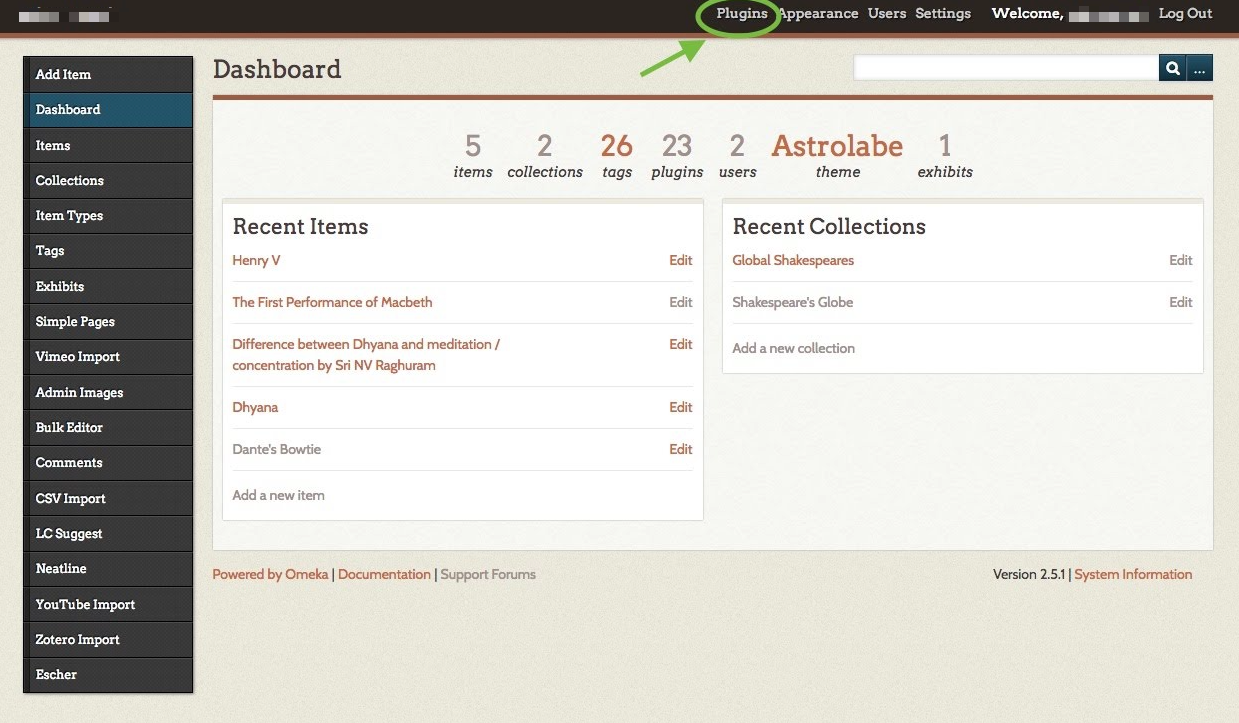
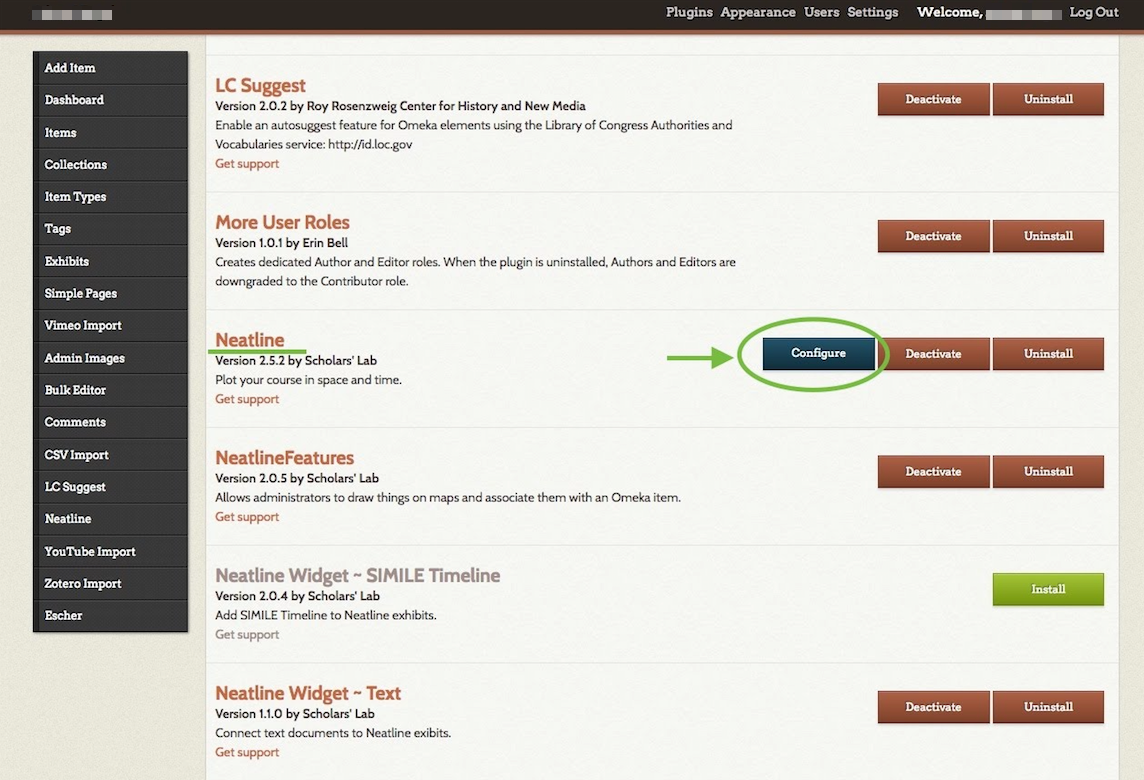
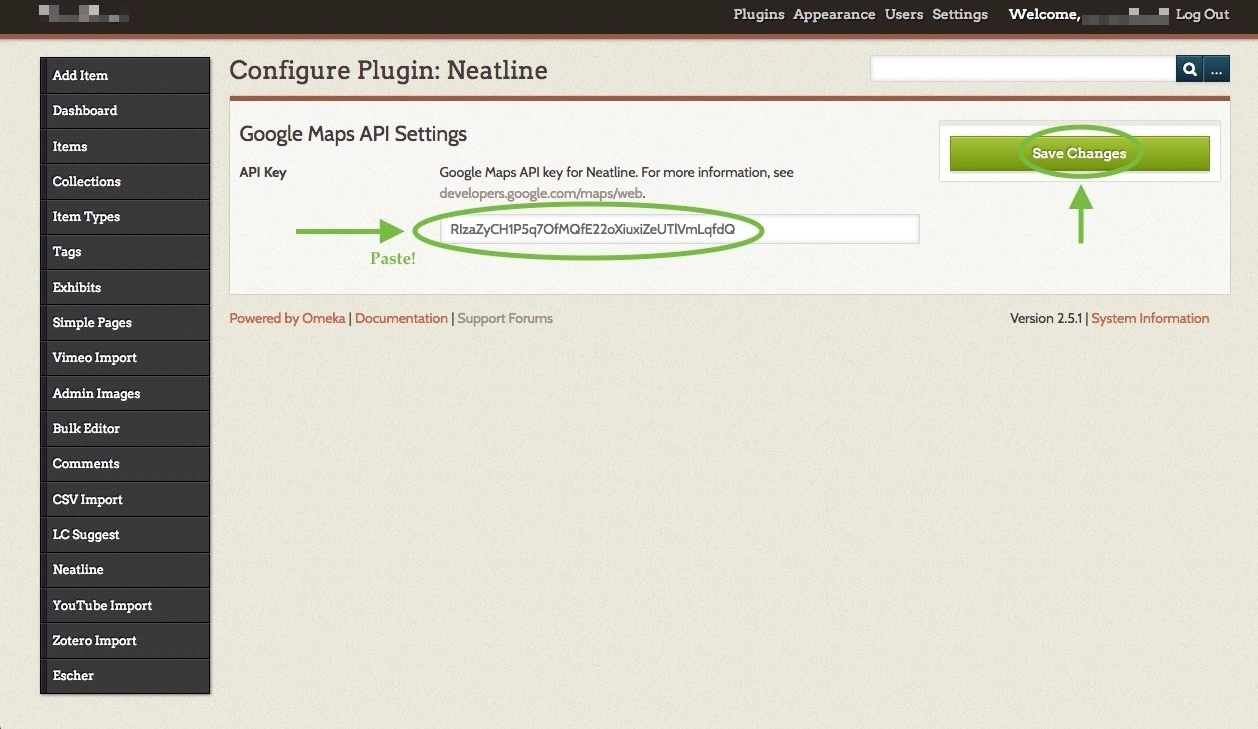
2. Go to your Plugins page in Omeka. Then, click “Configure” to the right of Neatline. On the configuration page, click the link to developers.google.com/maps/web. If possible, open this link in a new tab, since you’ll soon need to return to the configuration page.
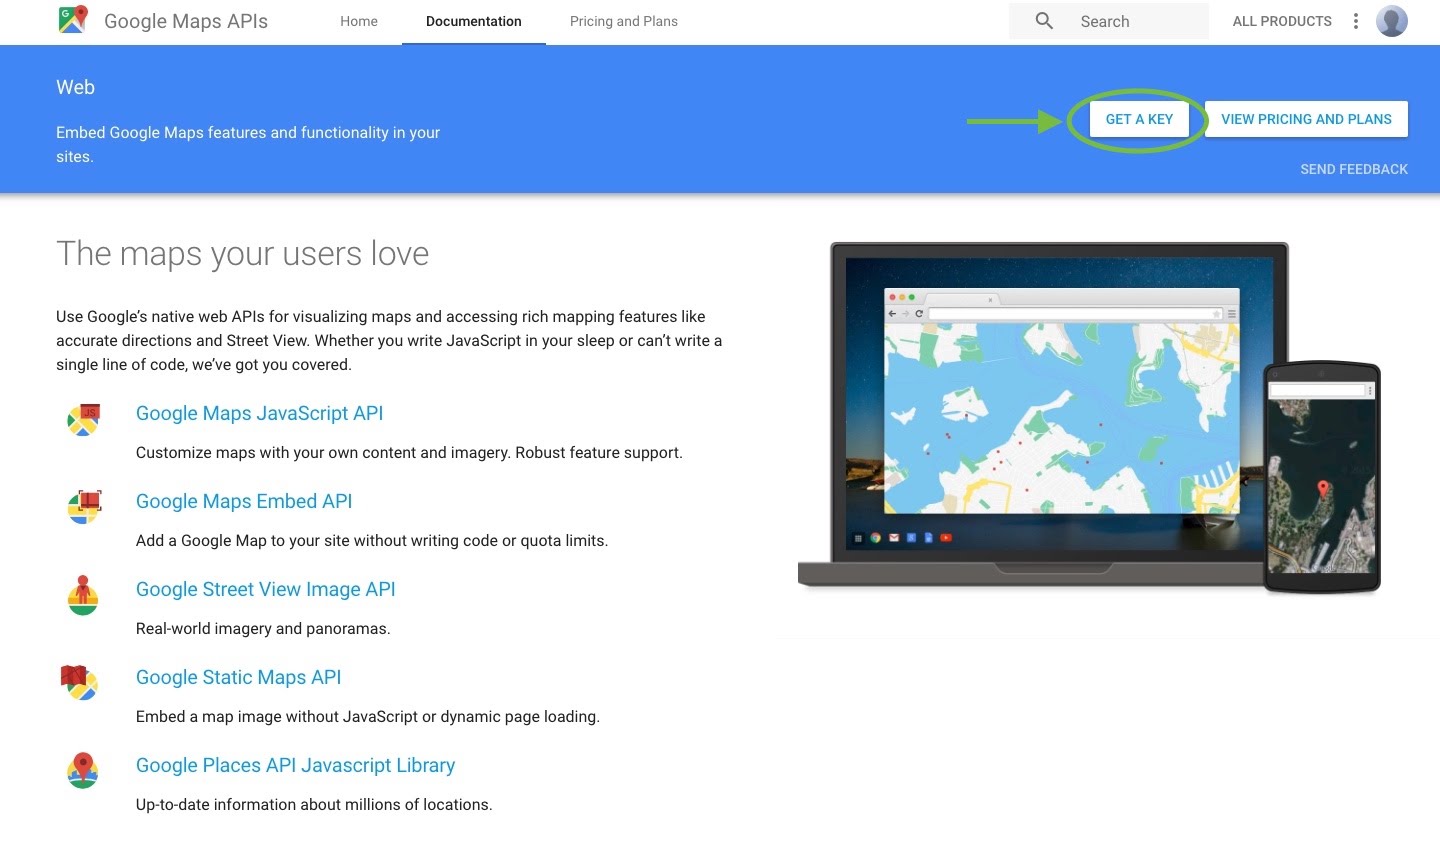
3. On the Google page that opens, click the “GET A KEY” button at top right. Follow the prompts in the pop-up window to create a new project, named whatever you’d like (this title won’t matter for your Neatline projects). When you’re given a long string of characters, copy it. This is your Google Maps API Key. You’ll only need it once.
4. Return to the Neatline configuration page from step 2. Paste your API Key into the text box. Then click the green “Save Changes” button. Neatline is now connected to Google Maps.
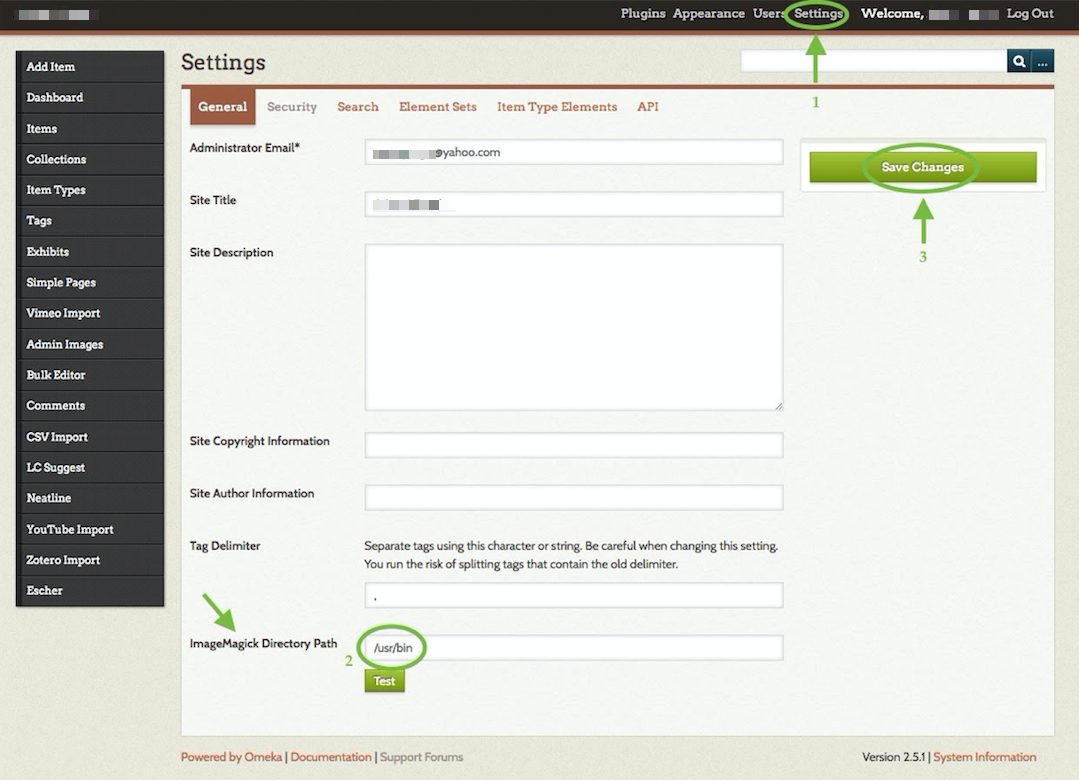
5. Click Settings at top right of your Omeka dashboard. In the text box to the right of “ImageMagick Directory Path,” enter this exact text without the quotation marks: “/usr/bin”. Then click the green Save Changes button at top right. This will allow Omeka to handle your images properly.
Neatline is now ready to go!

Laying the foundation

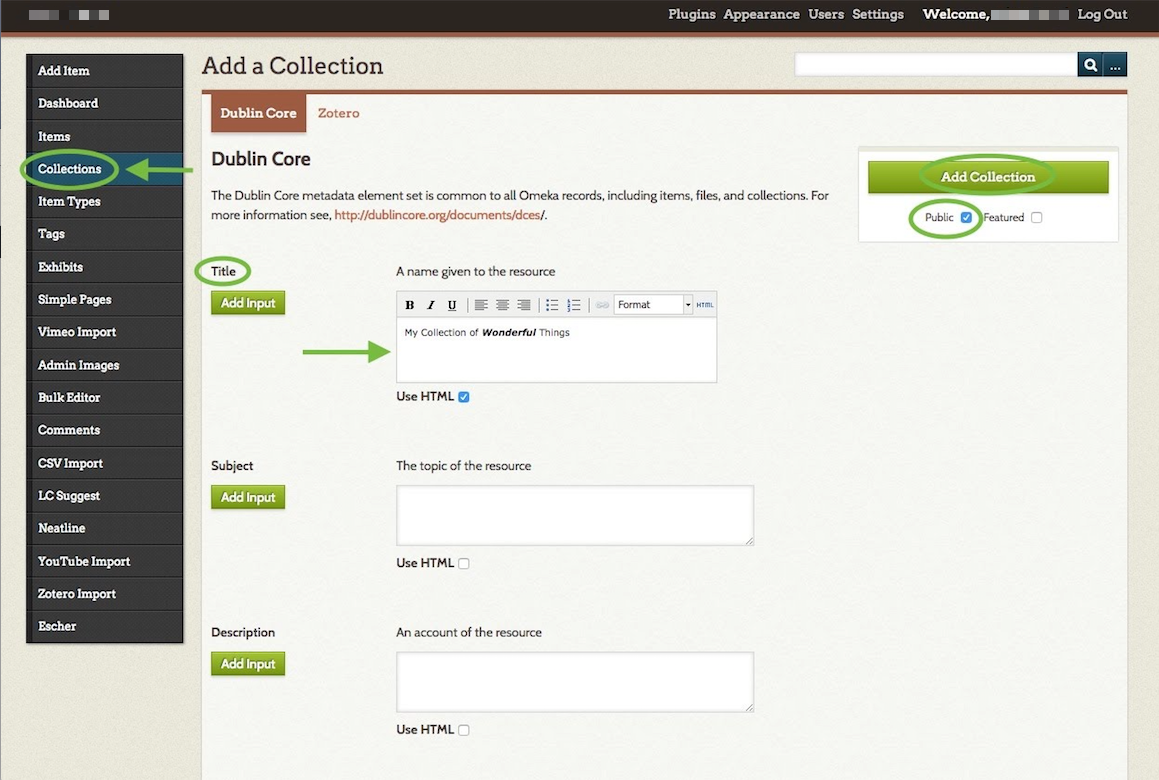
1. Optional: create one or more collections. This is an organizational tool: by creating collections now, you’ll be able to sort your items or bulk import them to Neatline more easily later. To create a collection, click “Collections” on your lefthand Omeka dashboard menu. Then, click the green Add a Collection button. On the Add a Collection page, give your collection a Title (you can leave all other boxes blank). If you want to add formatting to your text such as bolding or italics, check the box next to “Use HTML,” and more editing options will appear.

When you’re done, check the box next to “Public” and then click the green Add Collection button.

NOTE: You’ll see many fields when creating collections or items, but there’s no need to panic: almost all are optional and exist for archival purposes. Only fields with a * after them are required.
2. Begin creating items. Omeka is a tool for curating artifacts. In this step, you’ll begin this curation by creating items. To create an item, click “Items” on your lefthand Omeka dashboard menu. Then, click the green Add an Item button. On the Add an Item page, give your item a Title and a Description (you can leave all other boxes blank). This is the text that will ultimately appear to viewers of this record on your Neatline map. If you want to add formatting to your text such as bolding or italics, check the box next to “Use HTML,” and more editing options will appear.

Check the box next to “Public.” If you wish to add this item to a collection, select it from the dropdown menu under “Collection.”

If you wish to add images to your item, click the “Files” tab, then click “Choose File.” Follow the prompts to upload an image. To upload more images, click the green Add Another File button. These images will be displayed alongside your text when a viewer clicks the relevant point on your map.

If you wish to add tags to your item, click the “Tags” tab, then enter all desired tags in the text box, separated by commas. Remember to click Add Tag afterward.
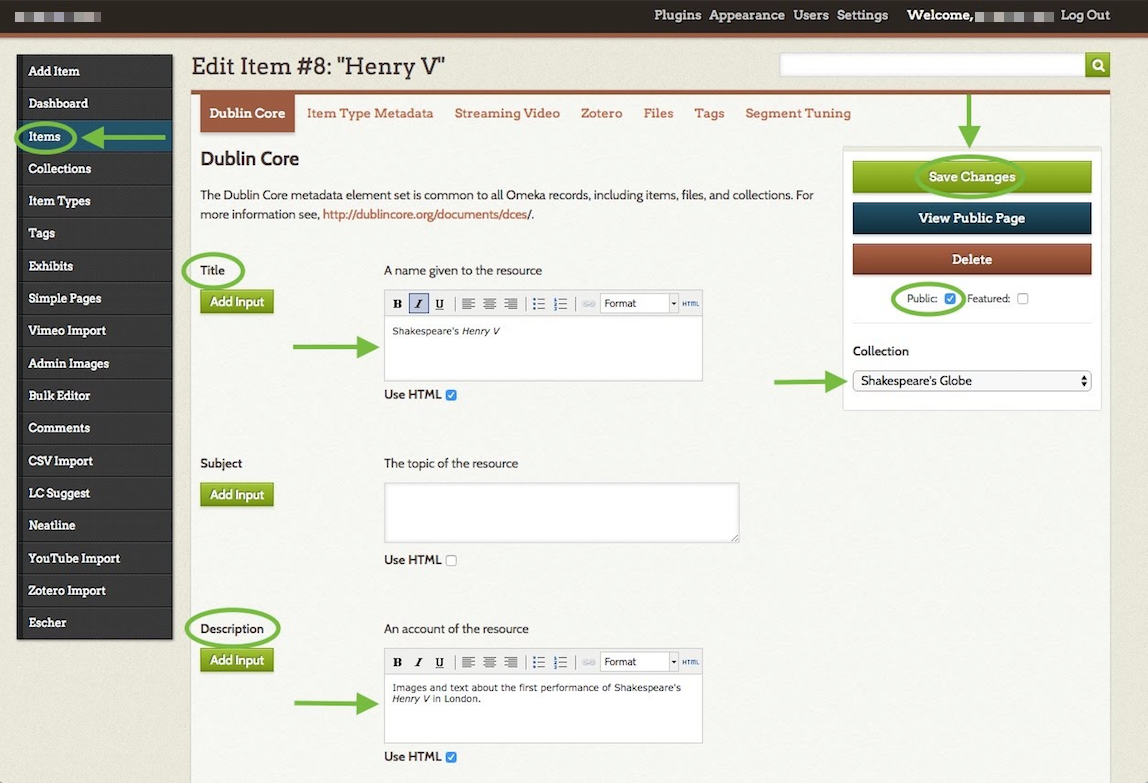
When you’re done adding text, files, and tags, click the green Add Item (or Save Changes if you’re editing) button.

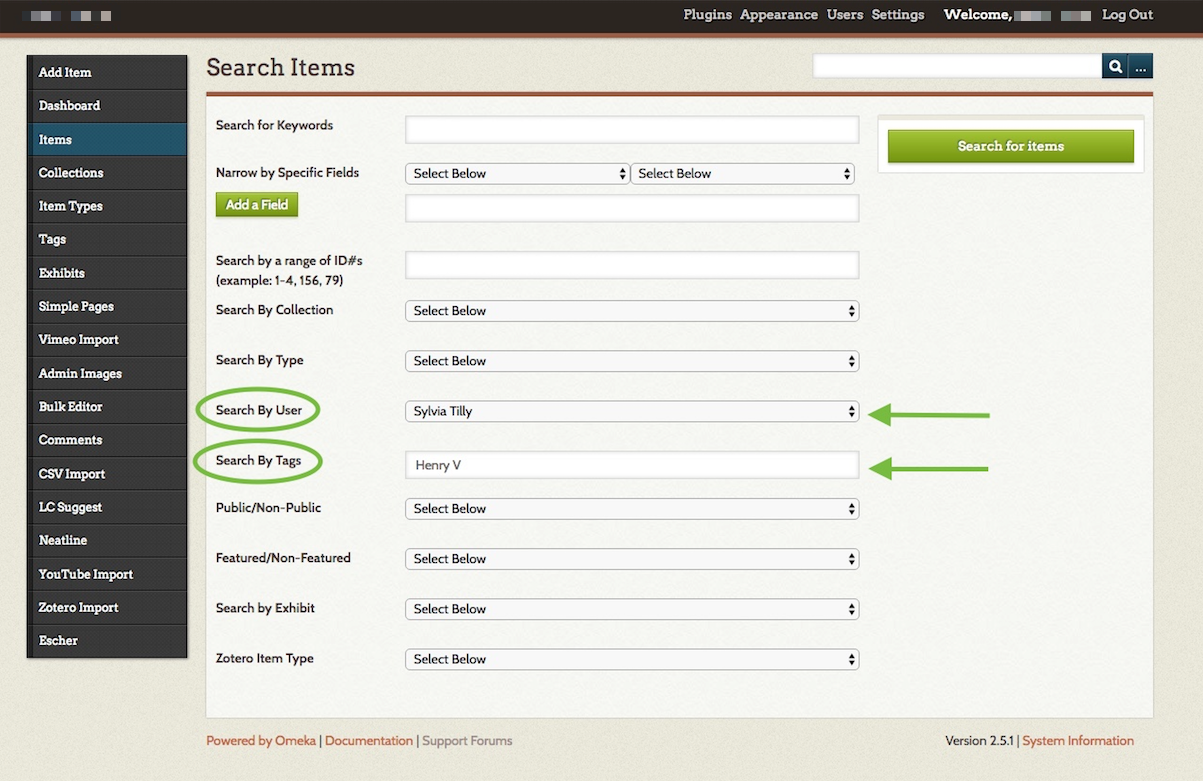
You can always find your list of items, with the option to edit each one, by clicking Items on your Omeka dashboard. From the Items page, you can also use the blue Search Items button to filter items by user or tag.
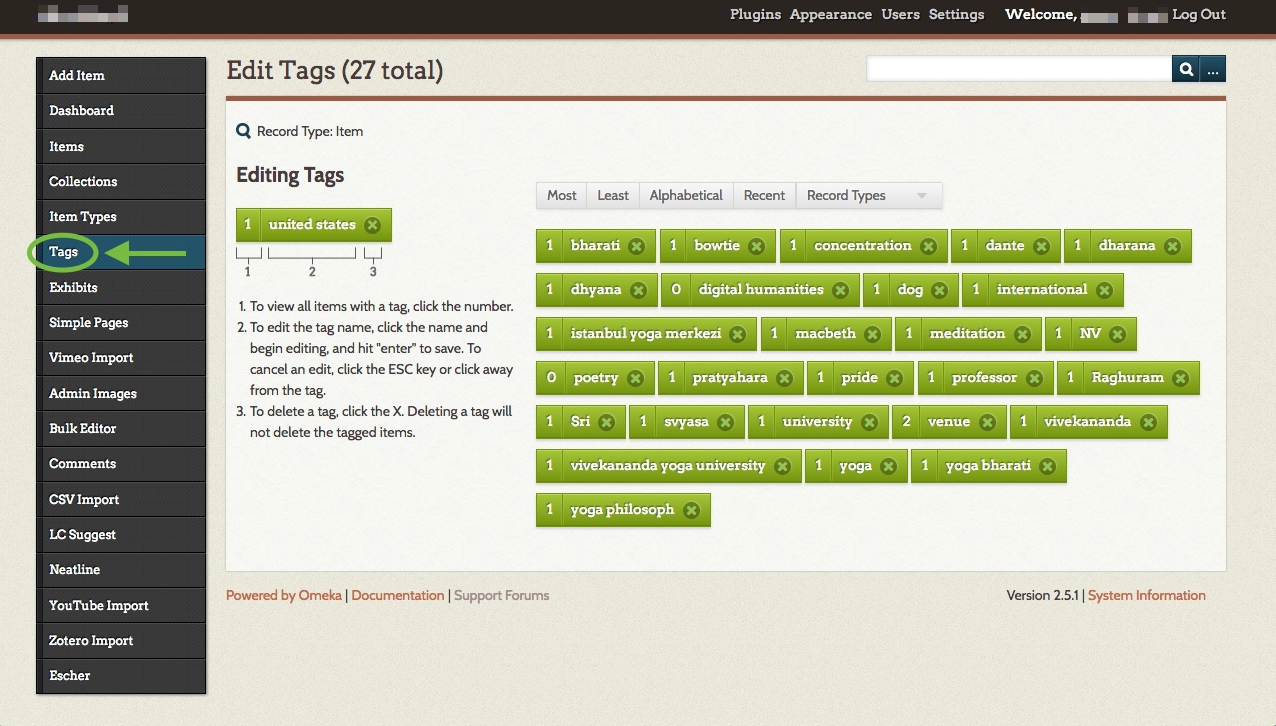
Clicking “Tags” on the Omeka dashboard will bring you to a list of all your tags. Click a tag’s name to edit it, or click the number to its left to view all items with that tag.
Managing Neatline exhibits and using the editor

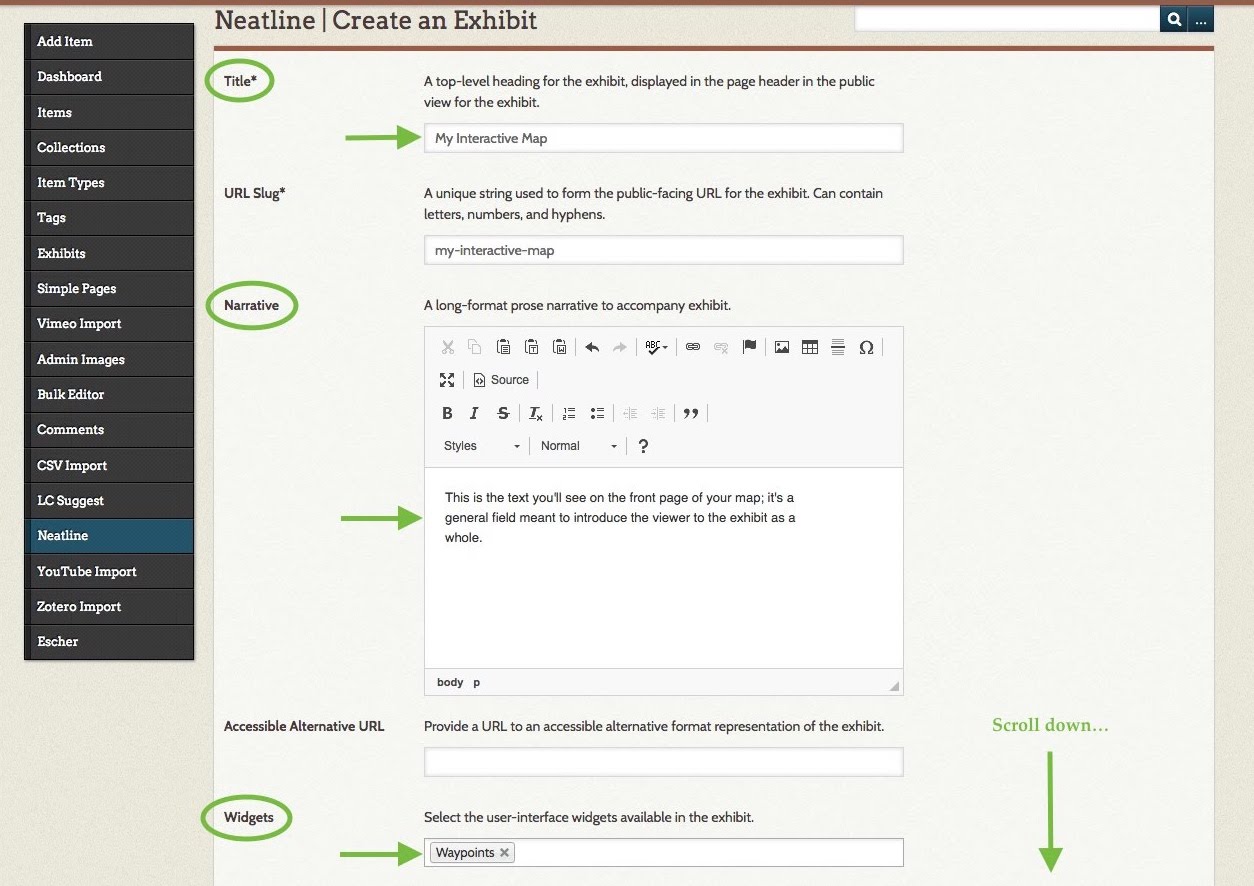
1. Create an exhibit. Your Neatline map will be known as an exhibit. It’s now time to create this map. Click Neatline on the lefthand dashboard menu, which brings you to the Browse Exhibits page. Then click the green Create an Exhibit button.

On the Create an Exhibit page: give your exhibit a Title, Narrative (optional but recommended), and Widgets (if you’d like to use Waypoints or another add-on you’ve previously installed). The Narrative is the exhibit’s primary textual description, and it will appear alongside your map.
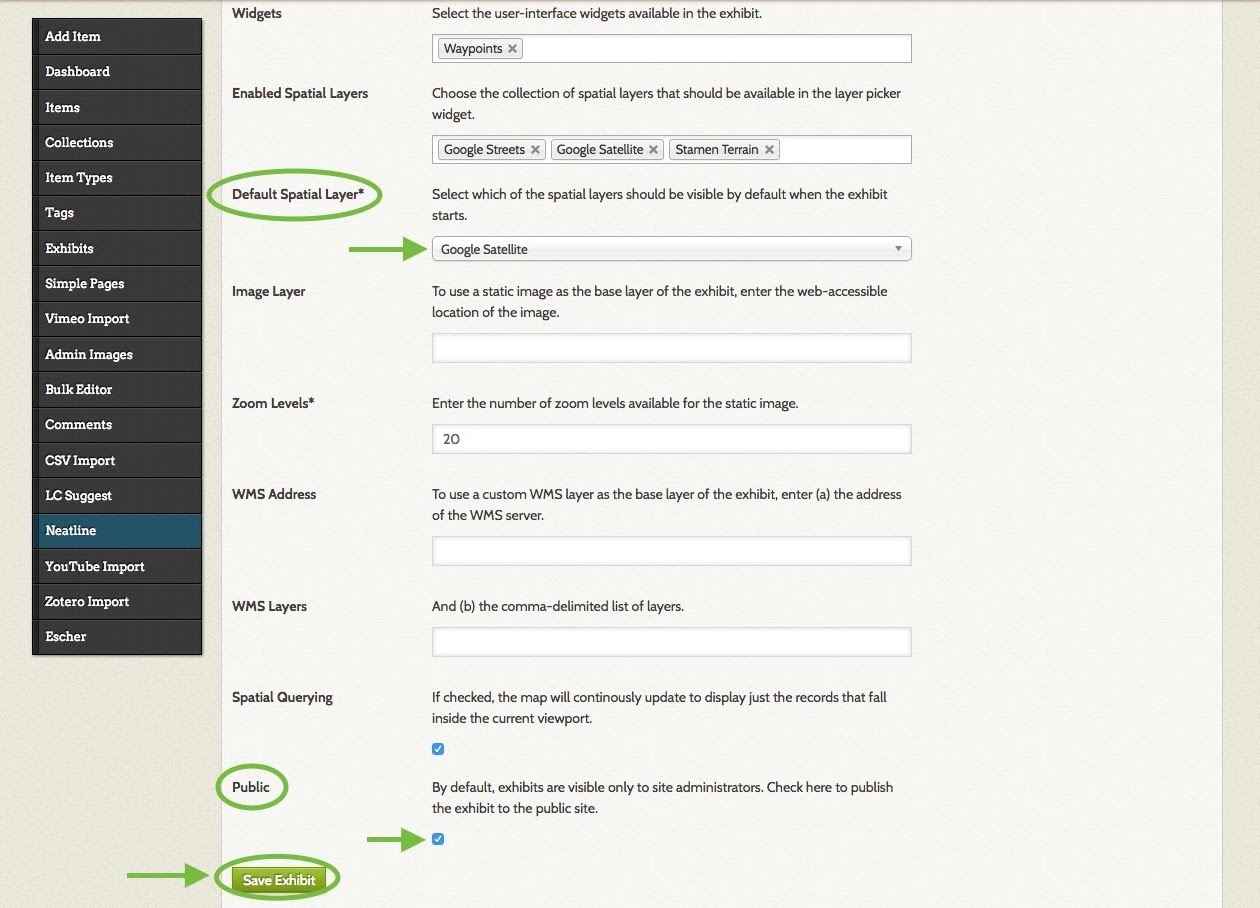
Scroll down and select a Default Spatial Layer from the drop-down menu. The Default Spatial Layer is the default map style your exhibit will display. You can edit this any time, so try out a few and see which aesthetic you like best. You can also optionally use the Embed Spatial Layers field to allow your viewers to toggle between various map styles.

The only other setting you need to change here (eventually) is Public: when you check this box, your exhibit will be live. When you’re done, click the green Save Exhibit button at the bottom of the form.
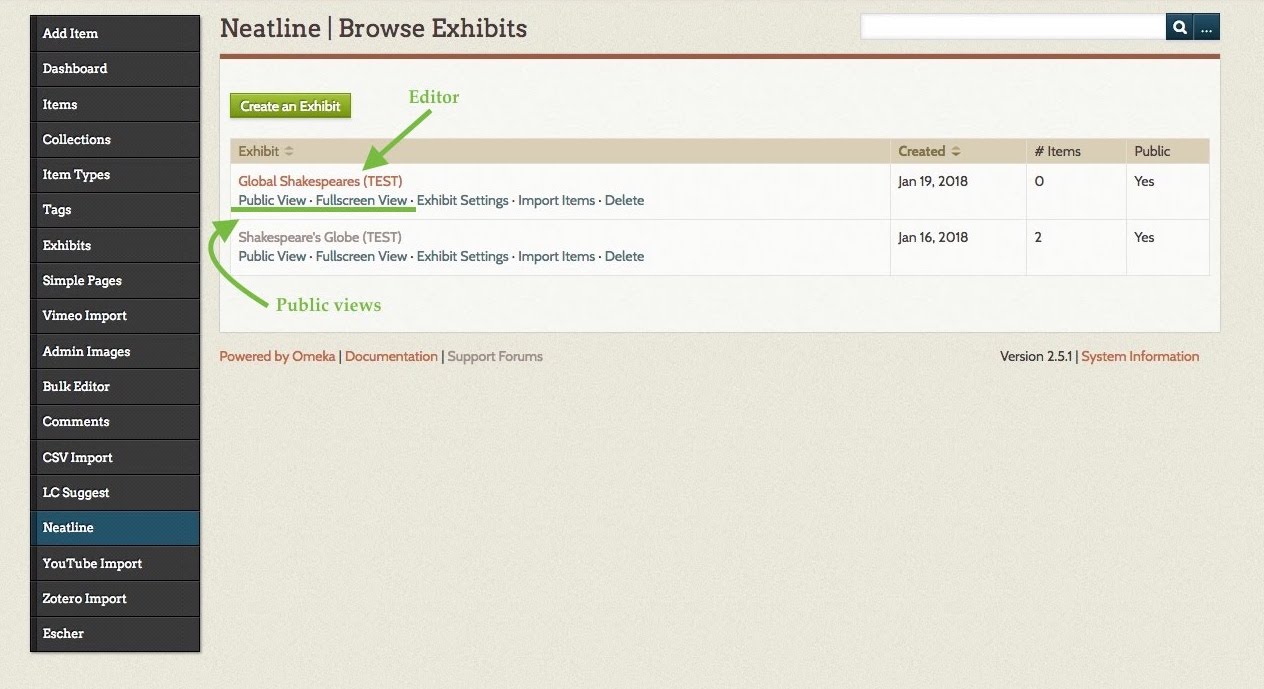
2. Access the Neatline editor. Return to the Browse Exhibits page from step 1. To access the editor, click your exhibit’s title. Clicking Public View or Fullscreen View will let you preview how your exhibit will look to visitors.
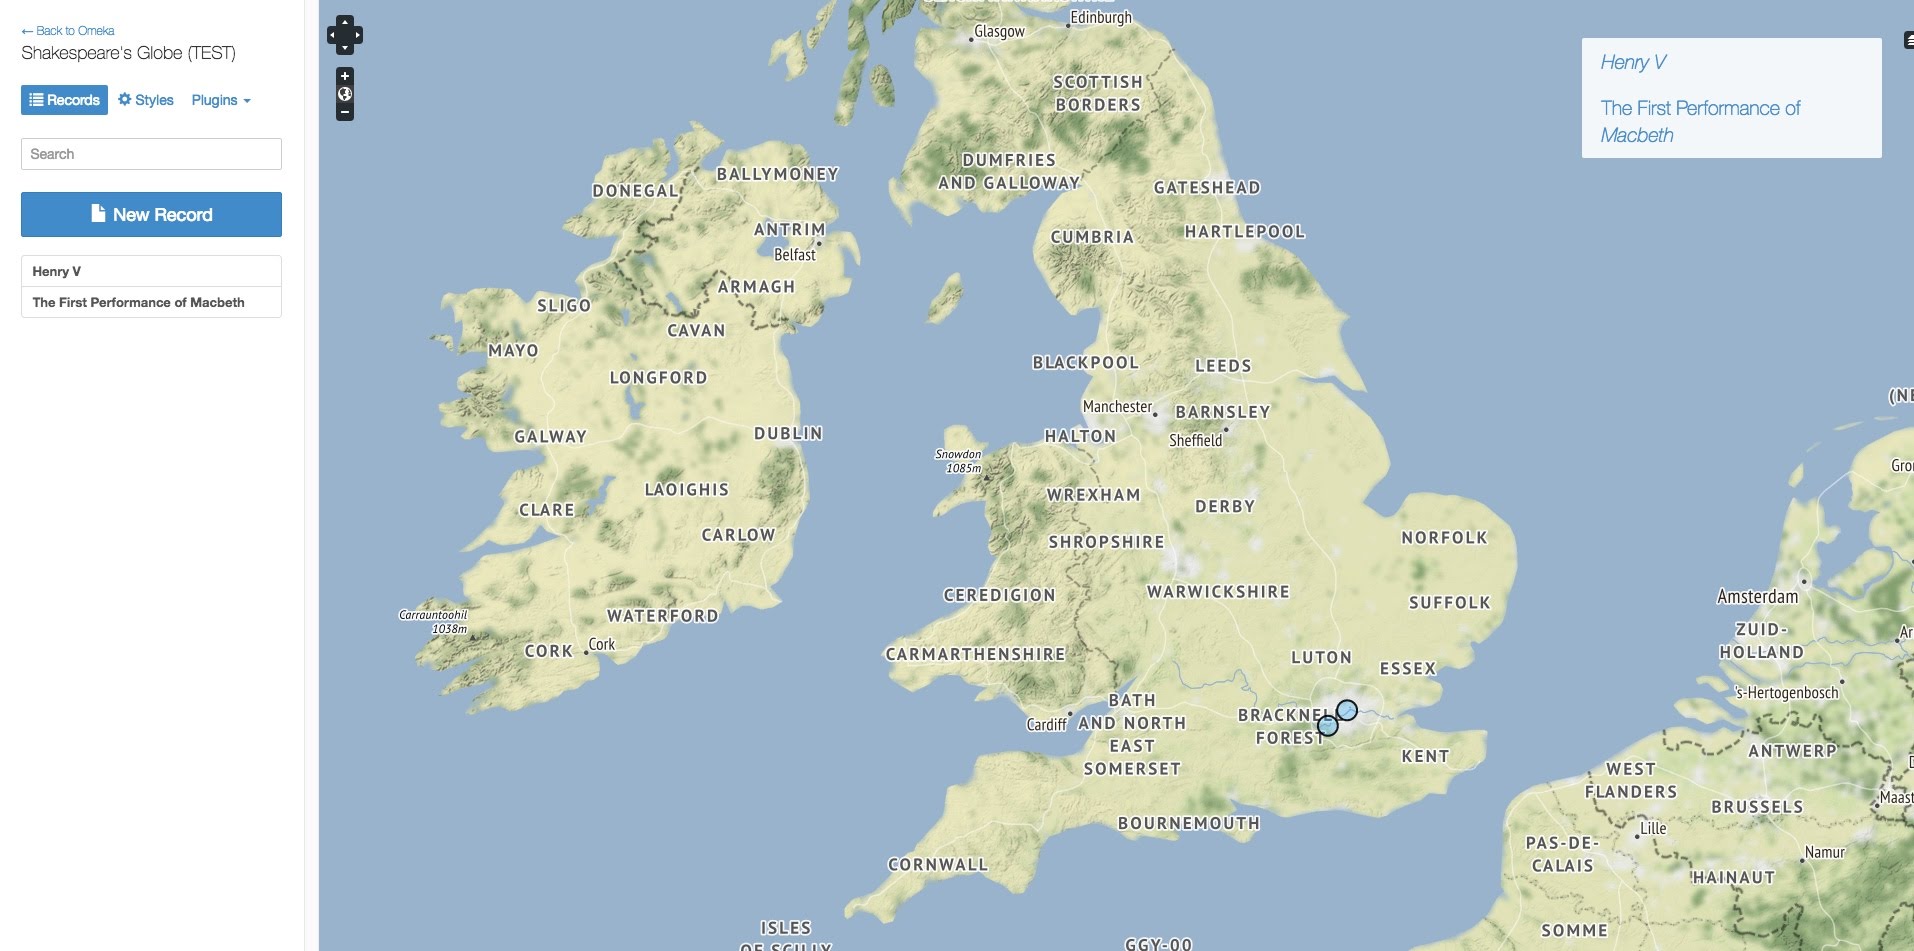
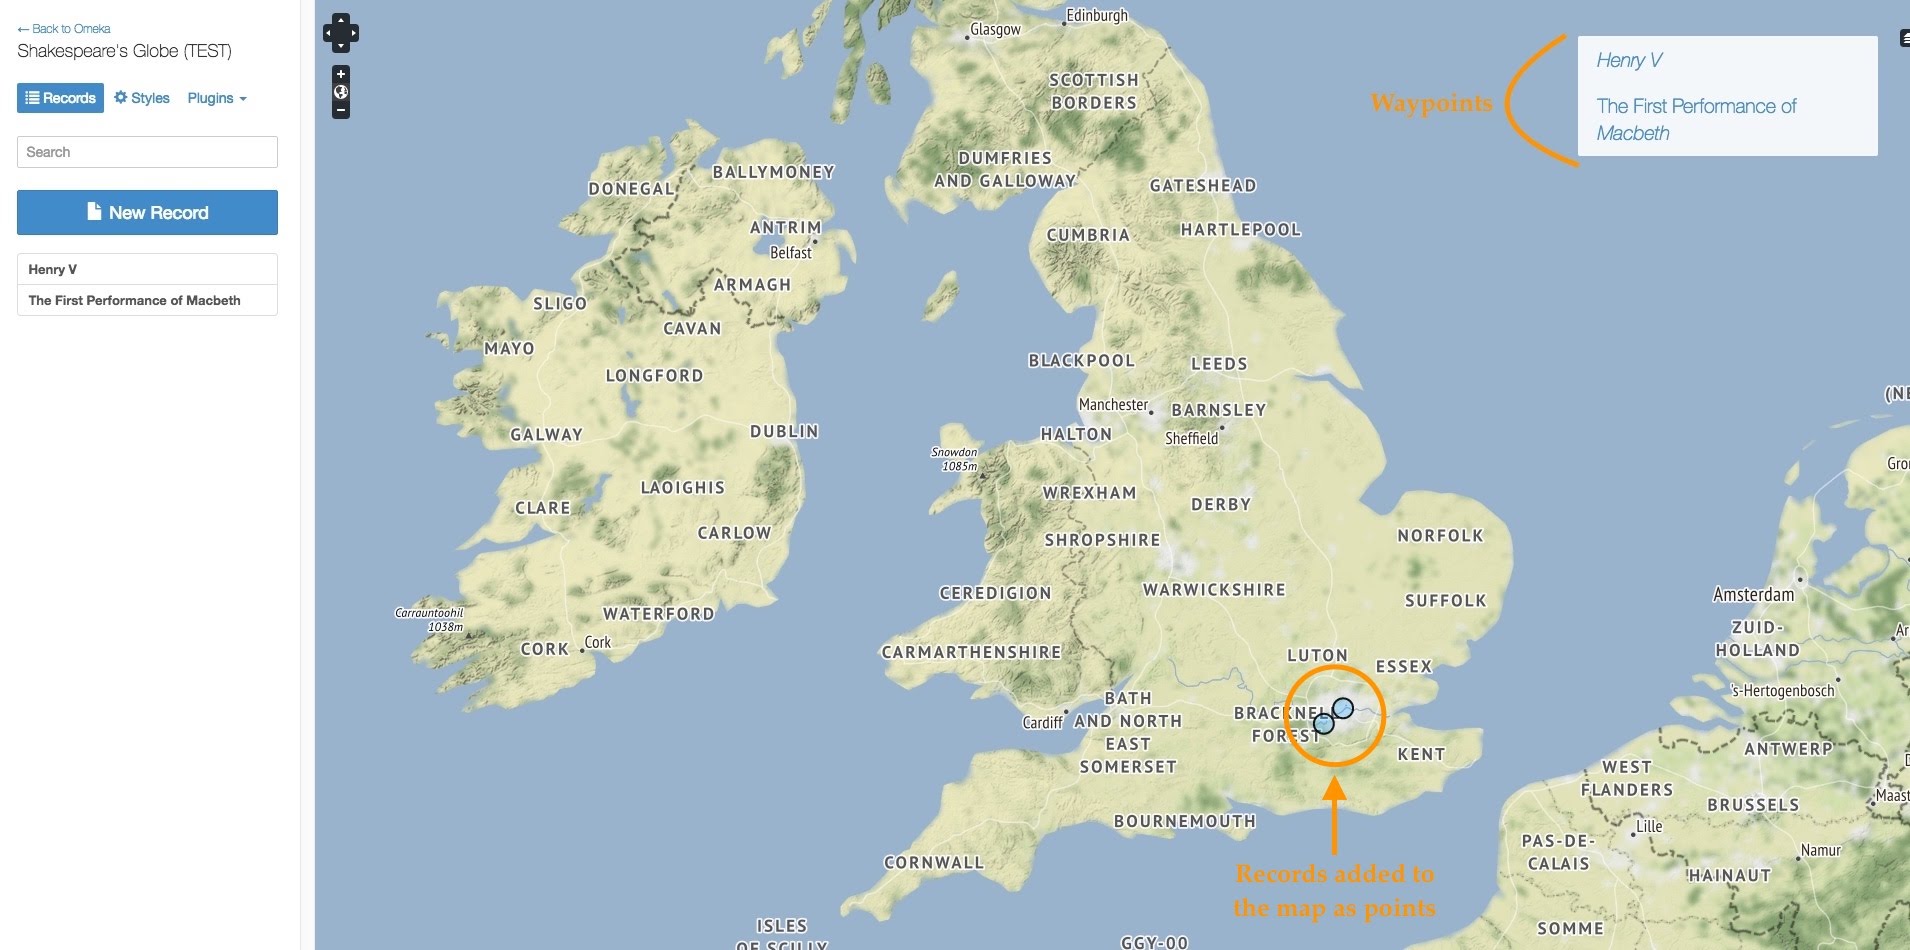
Here is what the editor looks like. Notice the Records, Styles, and Plugins tabs, and the list of records below the blue New Record button (there won’t be any records until you add some):
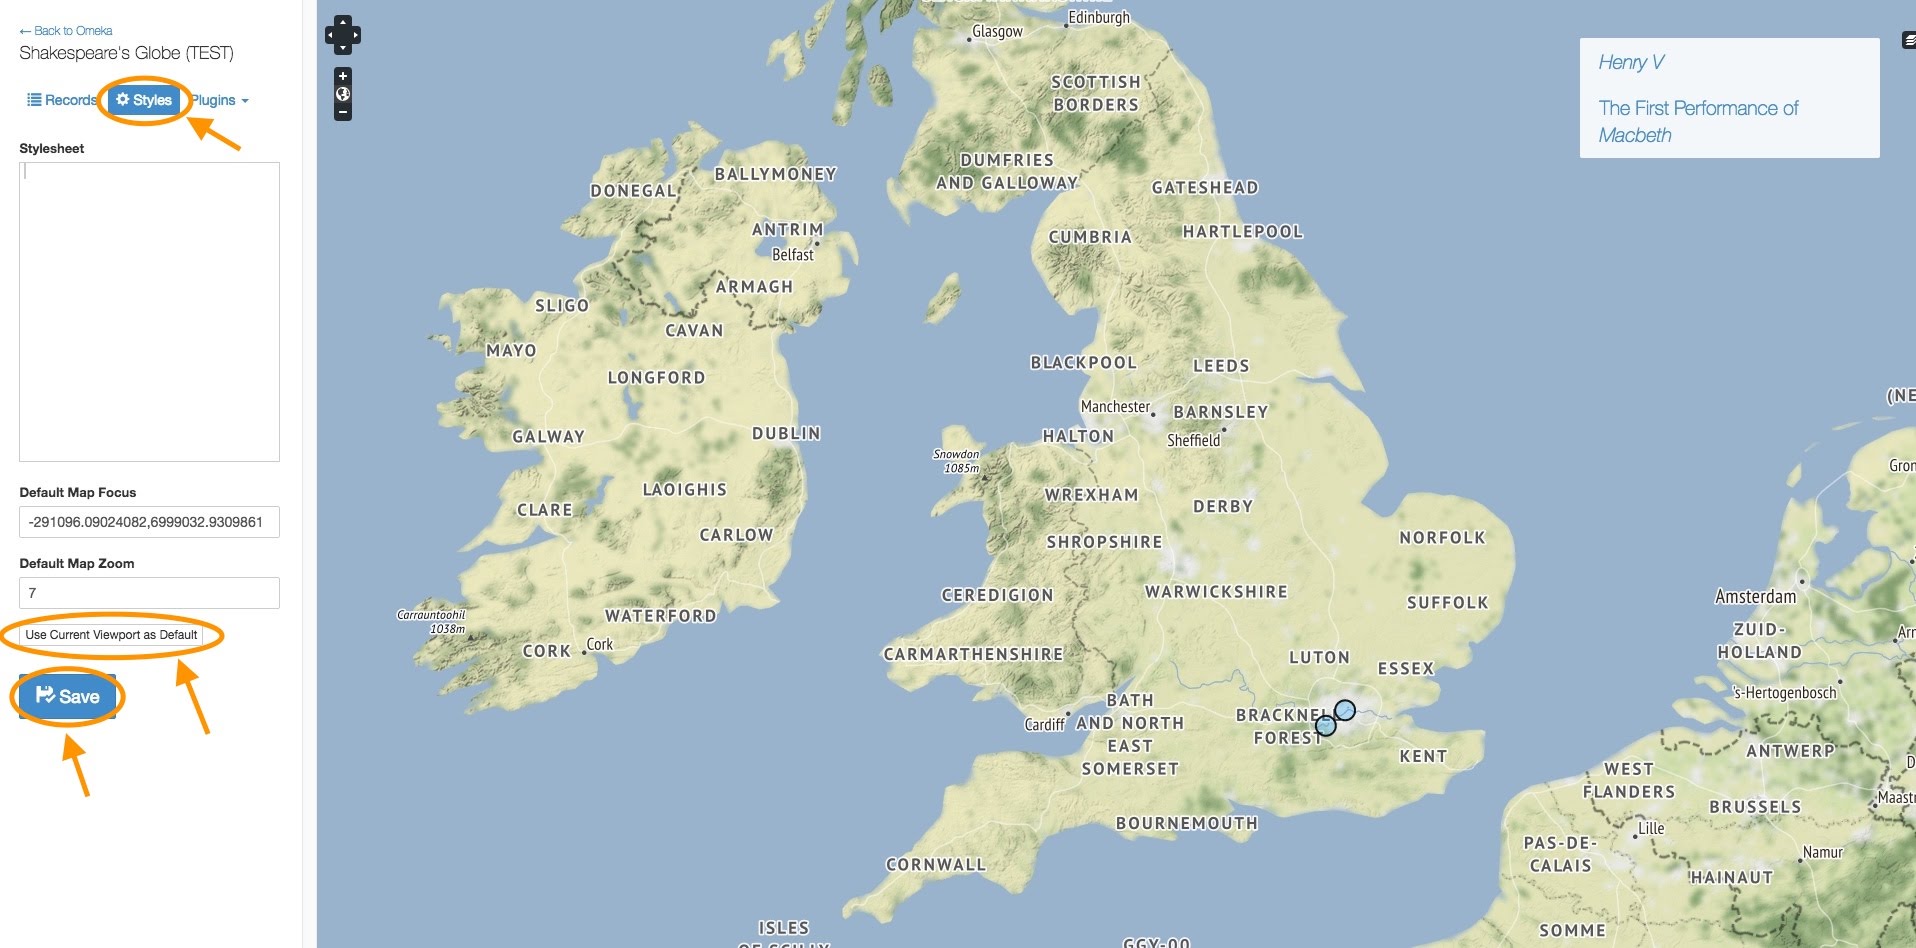
3. Set the default focus. This is the latitude/longitude and zoom that viewers will see when they first open your map (they’ll then be able to move it however they’d like). In the editor, click the Styles tab. Click and drag on your map to move it around, and use the + and – symbols at top left to zoom in and out. When you’re satisfied with the current view of the map, click the Use Current Viewport as Default button. This will automatically fill-in coordinates and the depth of zoom. You can also manually add these. When you’re done, click the blue Save button.
4. Import items into your exhibit, which then become records. First, click the Records tab in the editor. Then, click the large blue New Record button.

New tabs will appear. Click the Item tab. You’ll see a drop-down menu called “Search Omeka items.” This will list all the Omeka items you’ve previously created. Find the item you wish to add to the map and select it. The item’s content appears below the drop-down menu. If it looks correct, click the blue Save button. If not, click “View the item in Omeka,” edit the item, and try again.

NOTE: If you edit an item in Omeka that you’ve already imported into your Neatline exhibit, its record in the exhibit will be automatically updated.

NOTE #2: You can also create records from scratch using the New Record button and the Text tab (without making an Omeka item first). However, this isn’t recommended if you wish to include images or other media in your record, since that media would require additional HTML formatting.

5. Pin your records to the map. You can access any of your records from the list of records on the editor’s main page (see the screenshot in step 2 of this section, looking under the New Record button). Once you’re in a record, you can place it on the map. If you’ve just created a record using the Item tab from the previous step, then you’re already in that record.

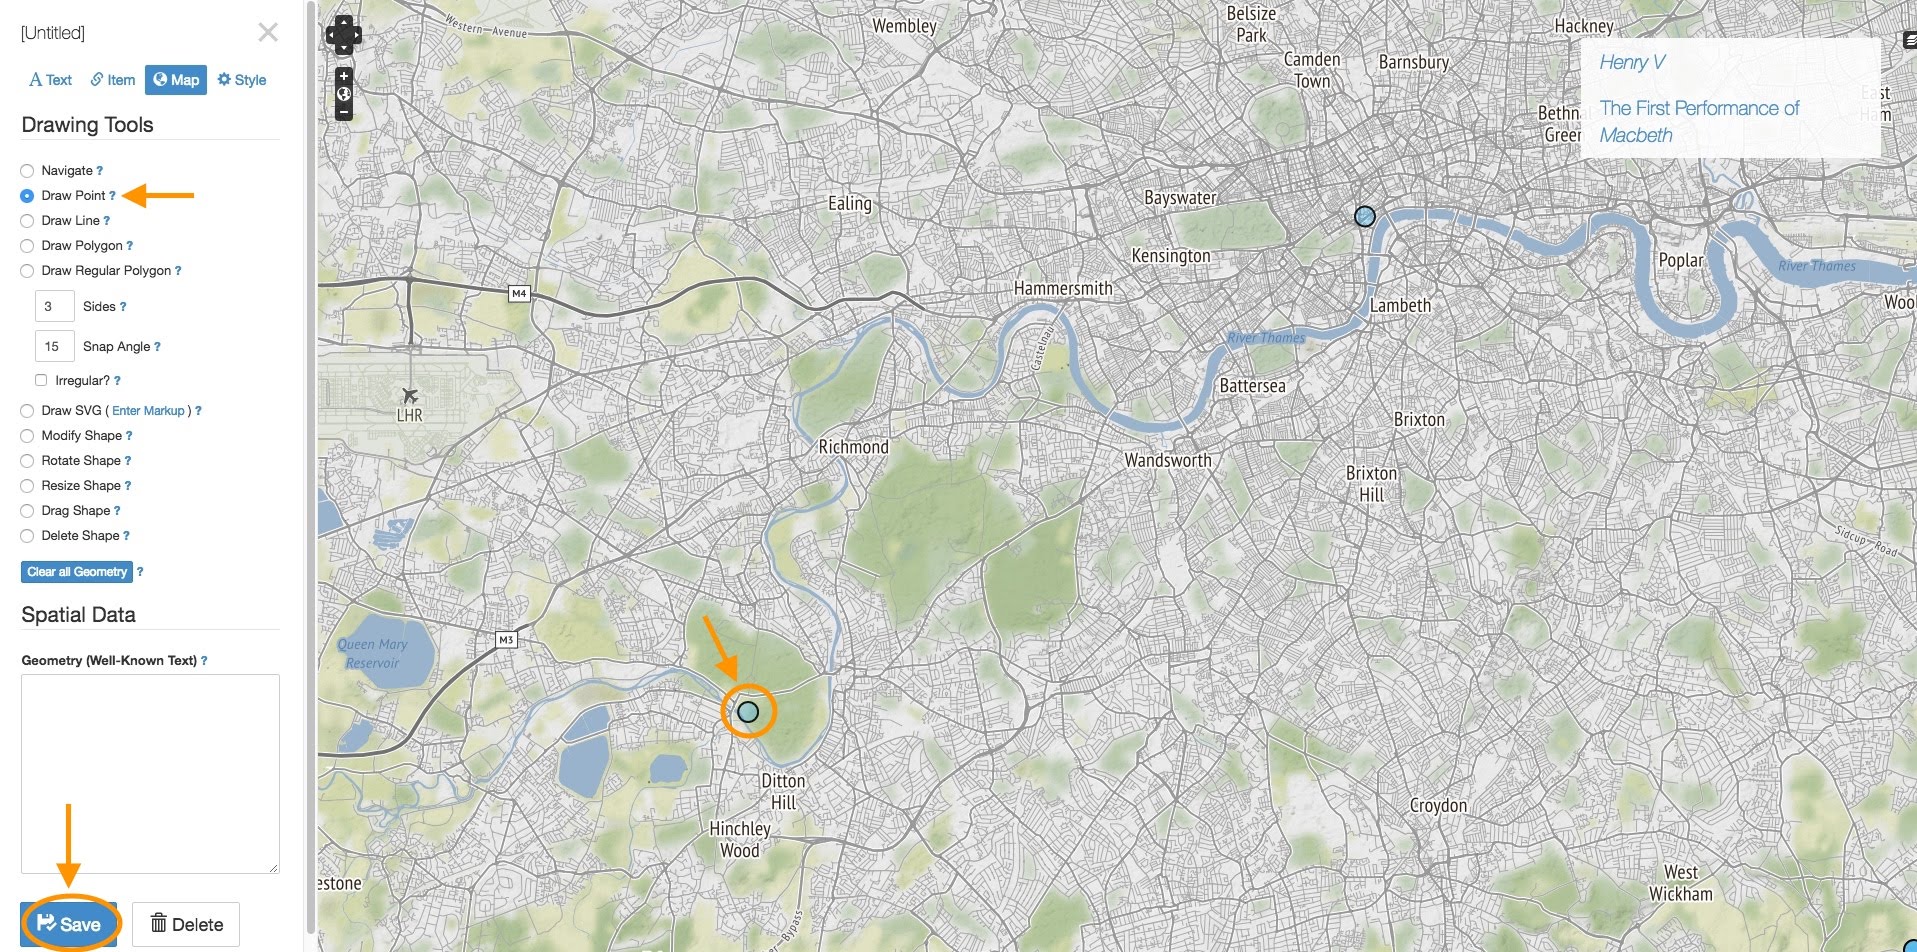
Once in the record, click the Map tab. You can draw many different shapes here (and feel free to experiment!), but for our purposes, we’ll look at two buttons: “Navigate” and “Draw Point.”

When “Navigate” is selected, you can move your map around without adding anything. When “Draw Point” is selected, you can click on the map to place a blue pin. When a viewer clicks this pin, she’ll see the record associated with it. When you’re done, click Save.

For example: I have a record containing text and images about Shakespeare’s first performance of Henry V in London. I can go into my Henry V record and use “Draw Point” to place a pin on London. Now, the viewer can click the blue dot on London to bring up this record.
Optionally, you can use the Style tab in a record (to the right of the Map tab) to change the appearance of points and shapes for that record.

You can add as many interactive points or shapes as you’d like.

6. Add widgets to your record (optional). If you’re using the Waypoints widget, select it by clicking in the Widgets field. See the next step for more information about Waypoints.

When you’re done, click Save. Then, you can exit out of the record and back to the editor’s main page by clicking the X above the Style tab. You can return to Omeka by clicking “Return to Omeka.”

7. Adding Waypoints: a table of contents for your map. The following guide from Neatline.org explains how to add a list of clickable records to your map, so viewers can jump from point to point without searching the map for them:
http://docs.neatline.org/working-with-the-waypoints-plugin.html
Linking your maps to your Omeka home page

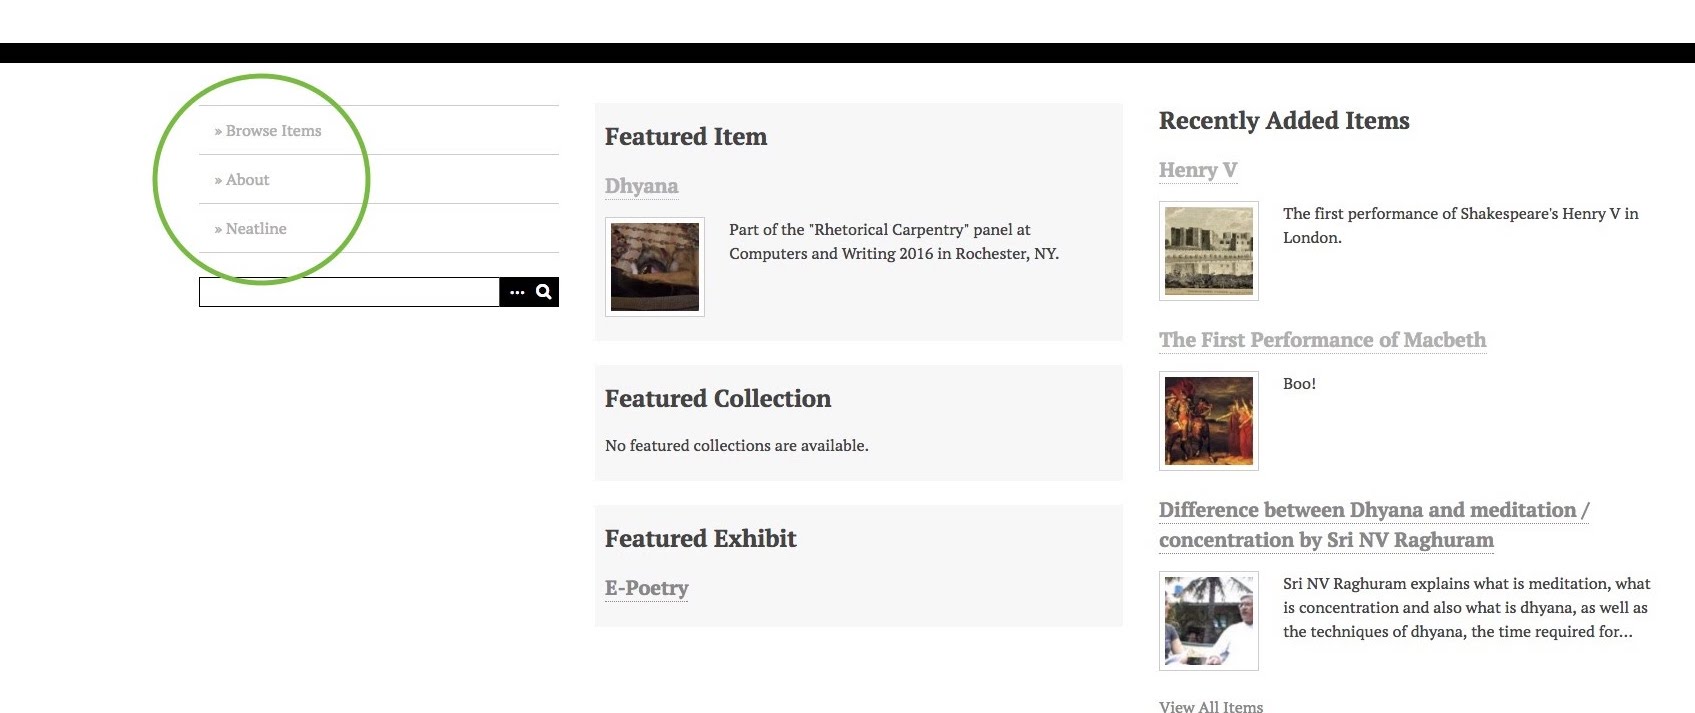
1. Choose what links you’d like to display on your home page’s navigation menu. This menu may appear in a slightly different place on your homepage depending on your theme. Here’s what it looks like in one of Omeka’s built-in themes (“Thanks, Roy”):
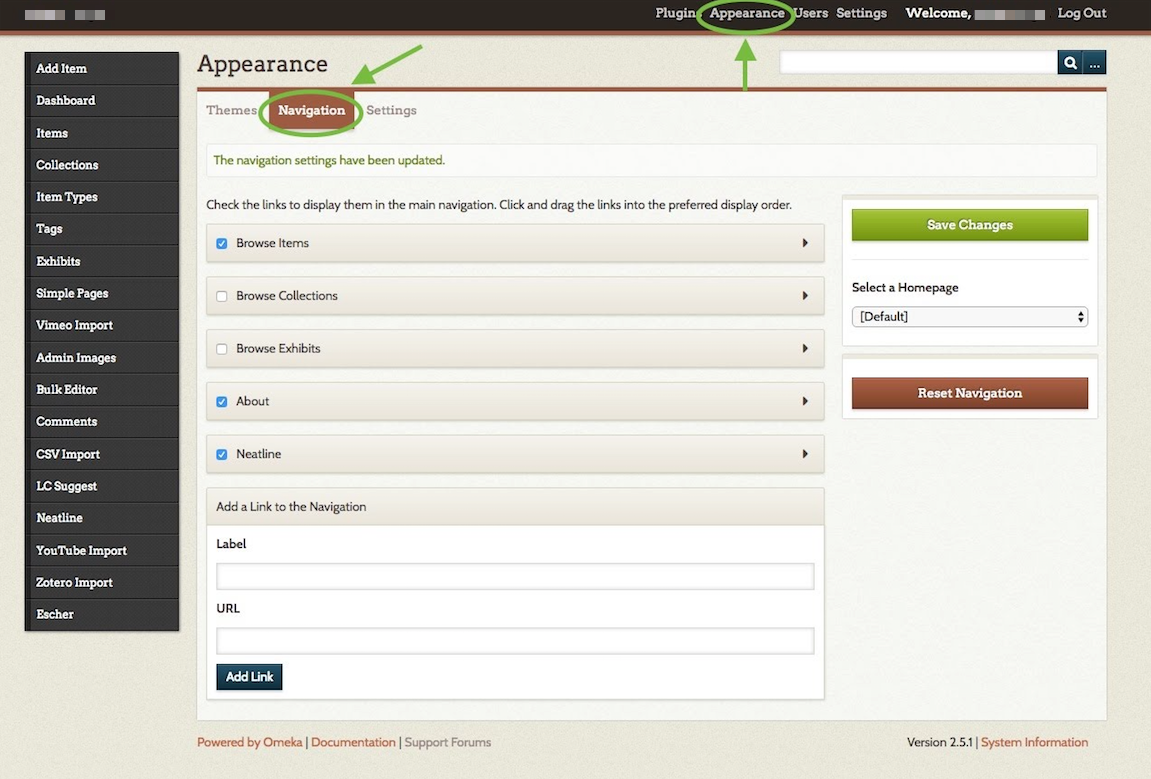
To edit this menu: from your Omeka dashboard, click Appearance in the black bar at the top of the screen. Then click the Navigation tab.
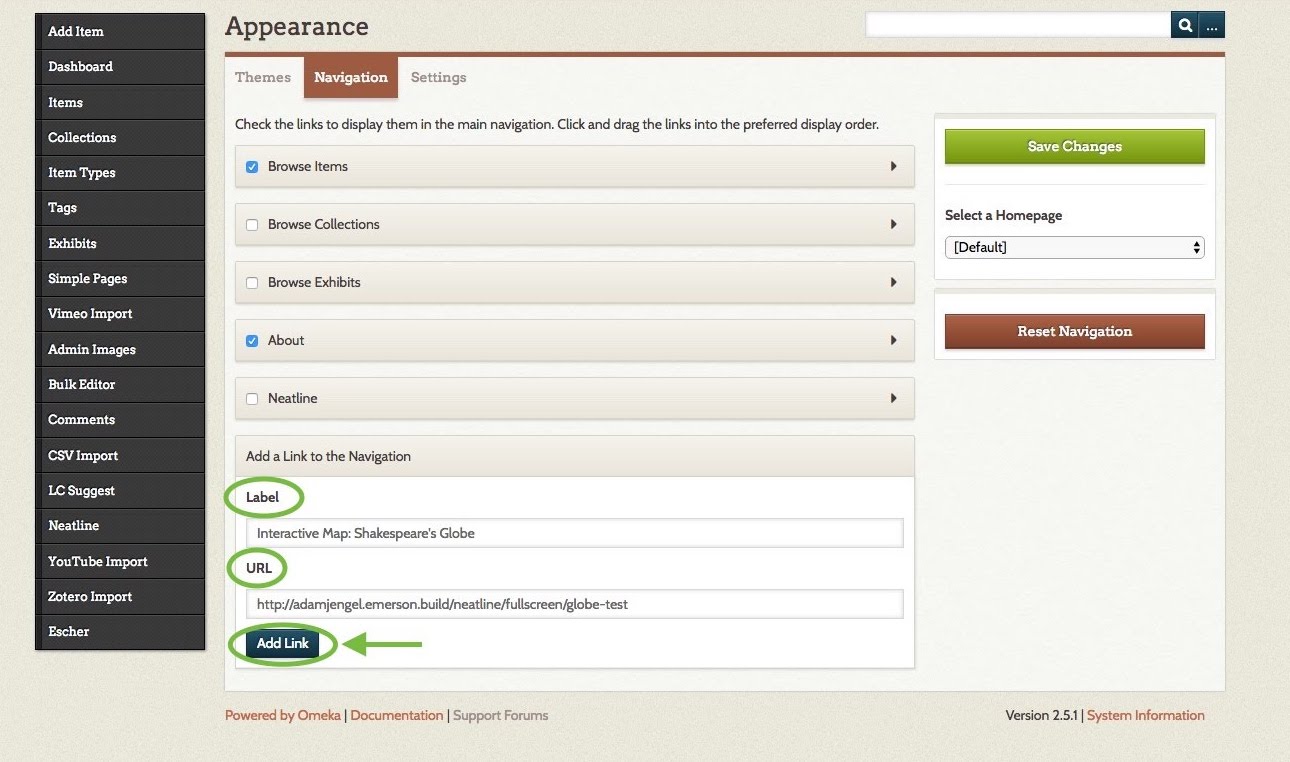
This takes you to a checklist of links. Each checked link will appear on your home page’s menu. To edit a link’s label (name) or URL, click the small black arrow to its right.

To add a new link: fill in the Label and URL fields at the bottom of this page, and then click Add Link. You can reorder the menu by clicking and dragging the links. When you’re done, click the green Save Changes button.
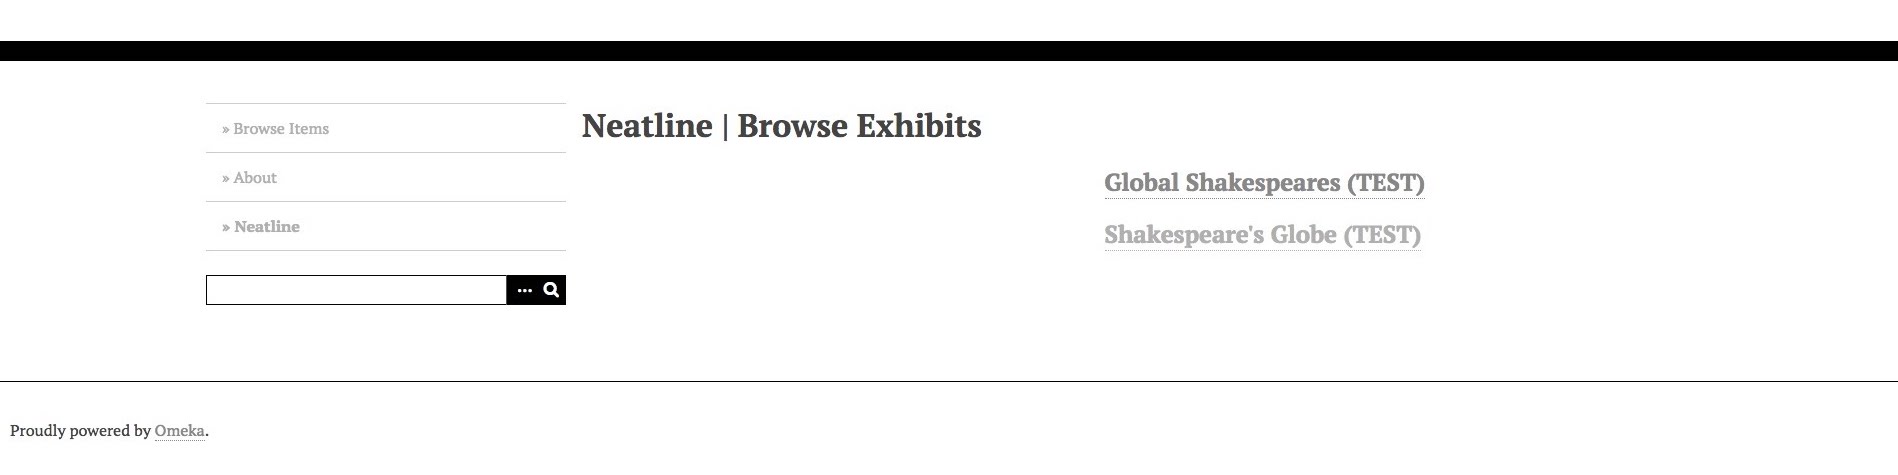
By default, there will be a link called “Neatline” which takes your viewer to a list of your Neatline exhibits. This is called the Browse Exhibits page, and looks like this:
If you’d rather have links on your menu to one or more specific exhibits, first pull up that exhibit’s public or full-screen view (see the screenshot for step 2 under Managing Neatline exhibits and using the editor above). Copy the URL from the address bar at the top of your browser. Paste it into the URL field on Appearance > Navigation, give it a label, click Add Link, and then Save Changes.

2. OR, choose a different default home page.

To use a list of your Neatline exhibits as your home page:
On Appearance > Navigation, click on the drop-down menu under “Select a Homepage” (to the right of the link checklist). Select “Neatline” (or whatever you’ve renamed it). Click Save Changes to finish.

To use a specific exhibit as your home page (taking your viewer directly to the map):
On Appearance > Navigation, add a link to the public or fullscreen view of the map you wish to be the homepage (see the previous step). Then, click on the drop-down menu under “Select a Homepage” (to the right of the link checklist). Select the link you’ve just added. Click Save Changes to finish.

Now you can share your Omeka site’s address with whomever you’d like, and they’ll be able to explore your interactive map!

WordPress Export/Import

If you are using your WordPress, you can also get an export of your posts, pages, comments, custom fields, categories, and tags.

The WordPress export is great for grabbing the content of your WordPress site so that you can import it into another WordPress host, such as WordPress.com or WordPress.org.

Note: Exports do not include plug-ins, or other site customizations.

Exporting

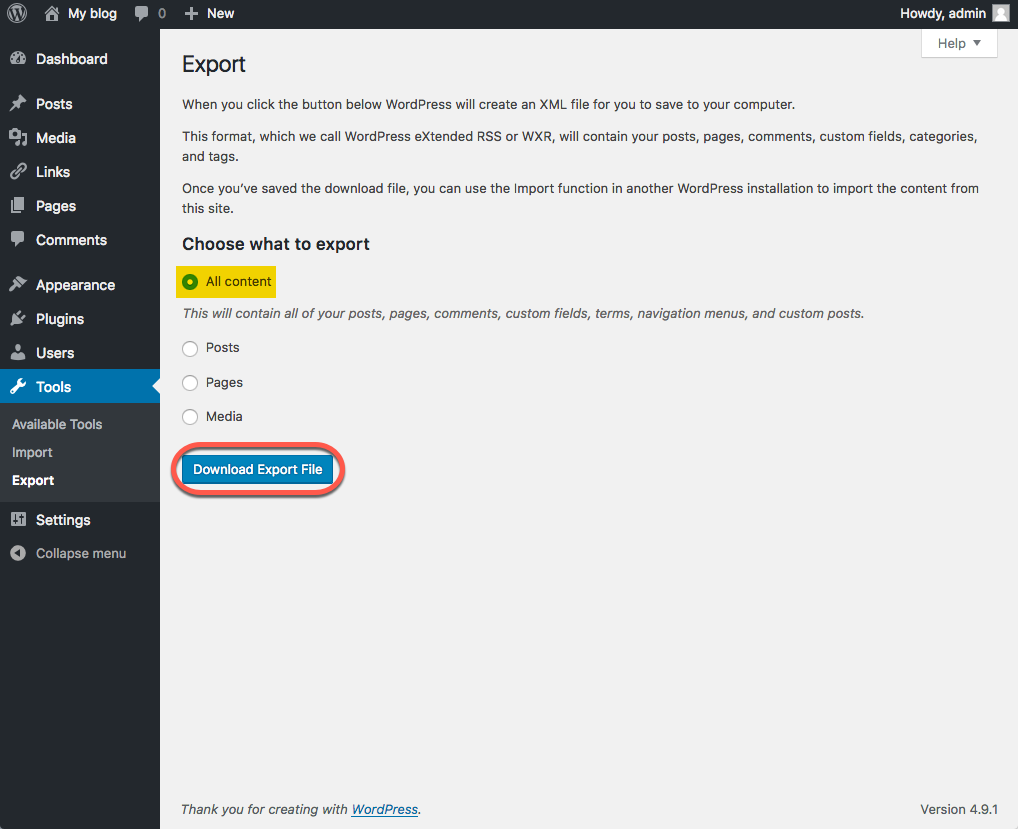
  1. From the Dashboard navigate to Tools>Export
    The screenshot below shows how to export all of your posts, pages, comments, custom fields, terms, navigation menus, and custom posts. However, you can also export just certain posts, pages, or media. The export page within WordPress

This export process generates an XML file of your blog’s content. WordPress calls this an  eXtended RSS or WXR file.

Note: This will ONLY export your posts, pages, comments, categories, and tags; uploads and images may need to be manually transferred to the new blog. If possible, do not delete your blog until after media files have successfully been imported into the new blog.

Importing

Once you have exported your posts, pages, etc., you can import them into your new WordPress site.

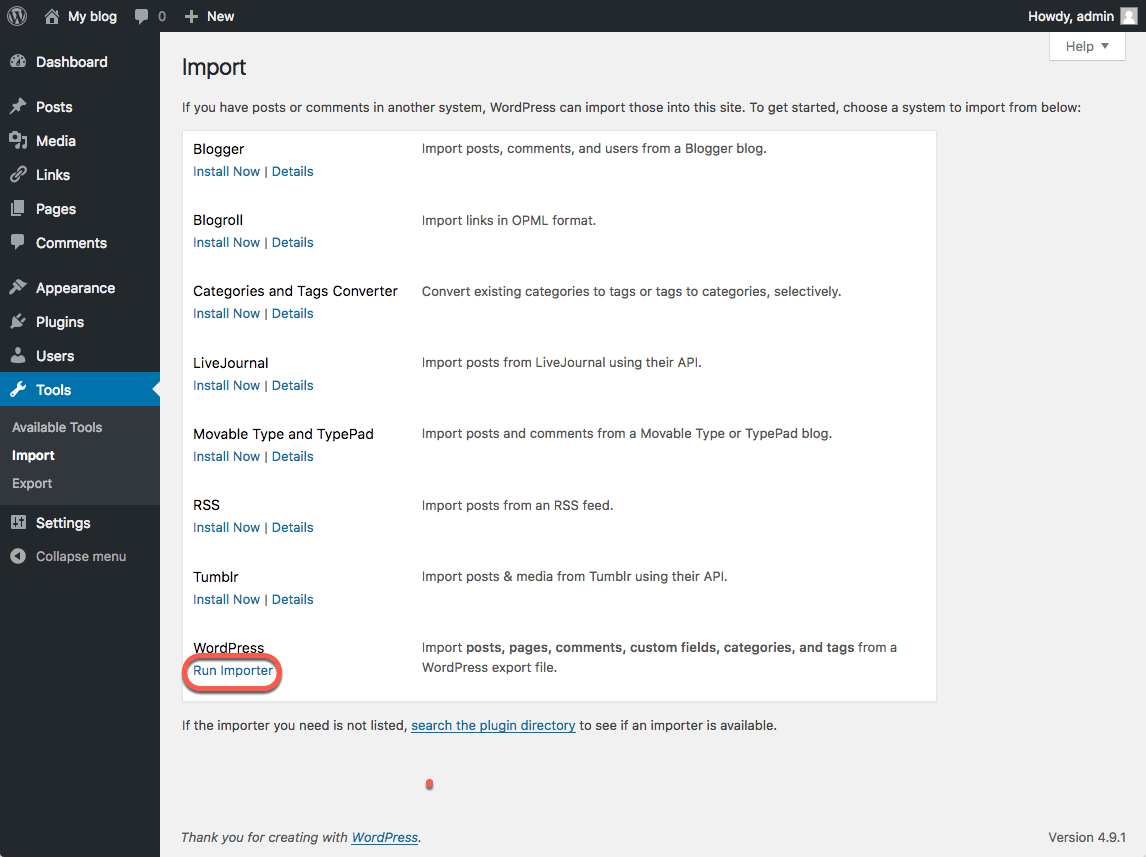
  1. Login to your new WordPress.com or self-hosted WordPress site and go to the Dashboard.  From there navigate to Tools>Import and click on the link to “Run Importer
    Screenshot showing where to find the WordPress Importer
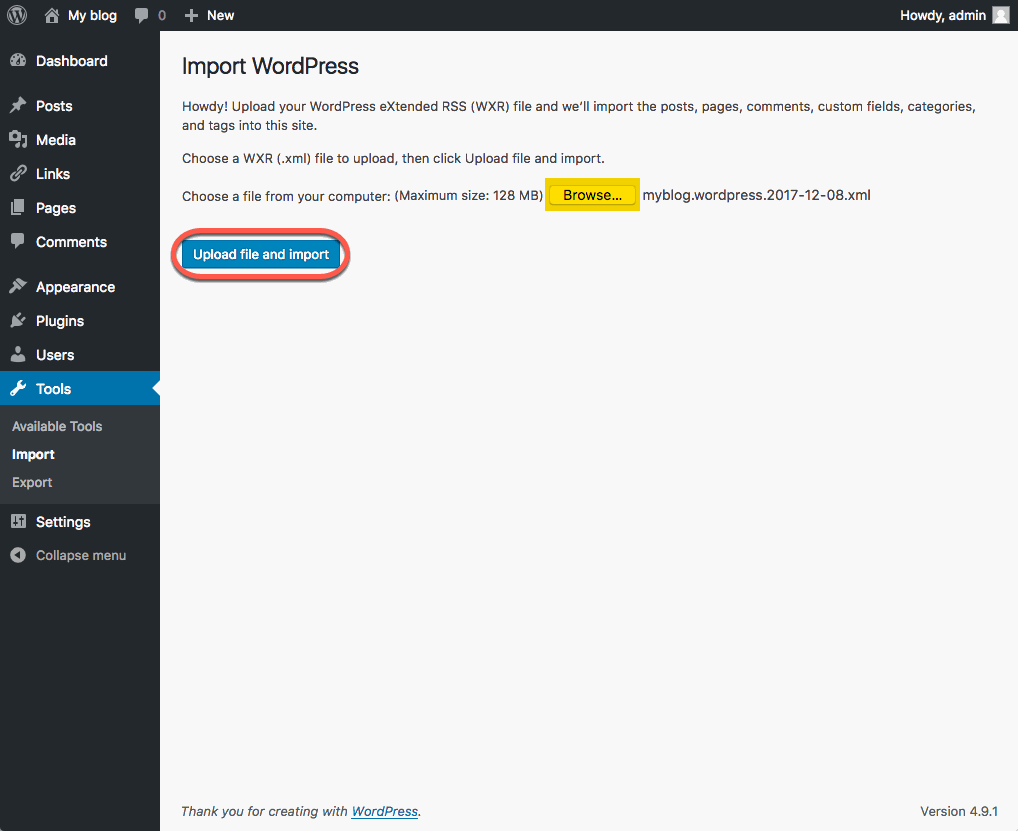
  2.  Next you will see a screen that prompts you to upload the WXR (.xml) file you generated through the export process. Browse to your exported WordPress archive and then click the “Upload file and import” button.
    Upload file and import
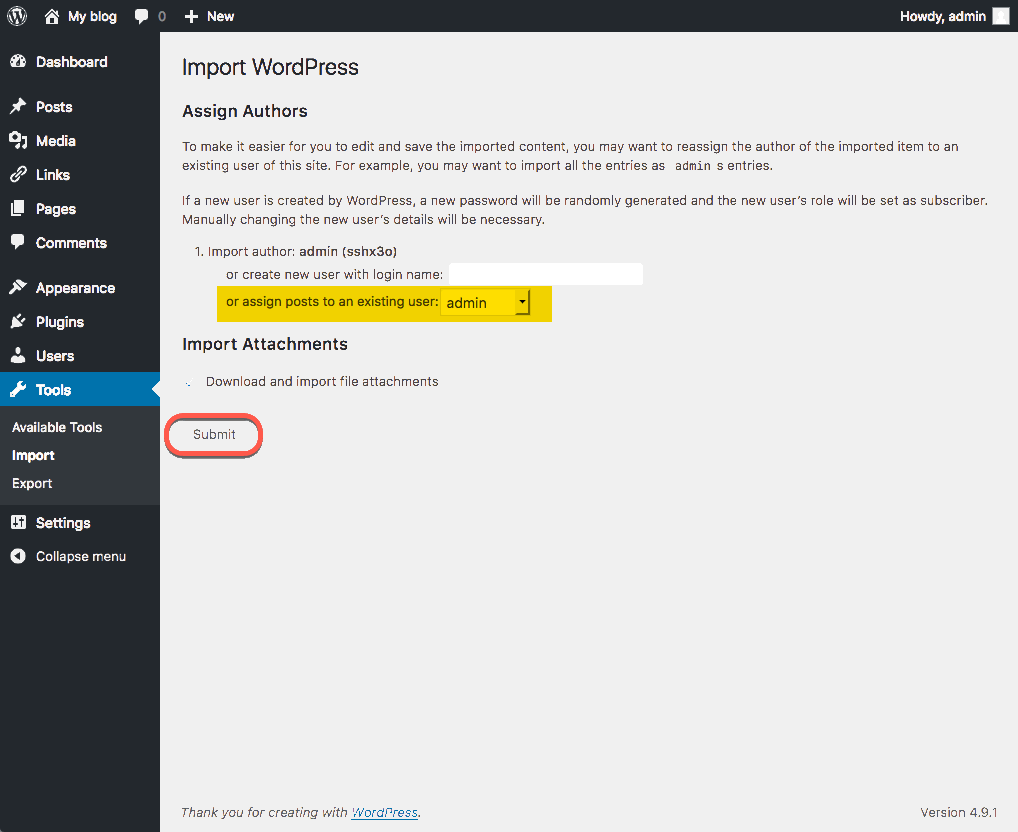
  3. Choose and upload your file.  You will then be prompted to assign an author to the posts that you are importing.  You can use this function to assign one author to all posts, or you can manually set the author for each post in the posts menu. Unless you have a space limit, you will also want to select the option to “download and import file attachments” before clicking the “Submit” button.
    Select desired import options and click the
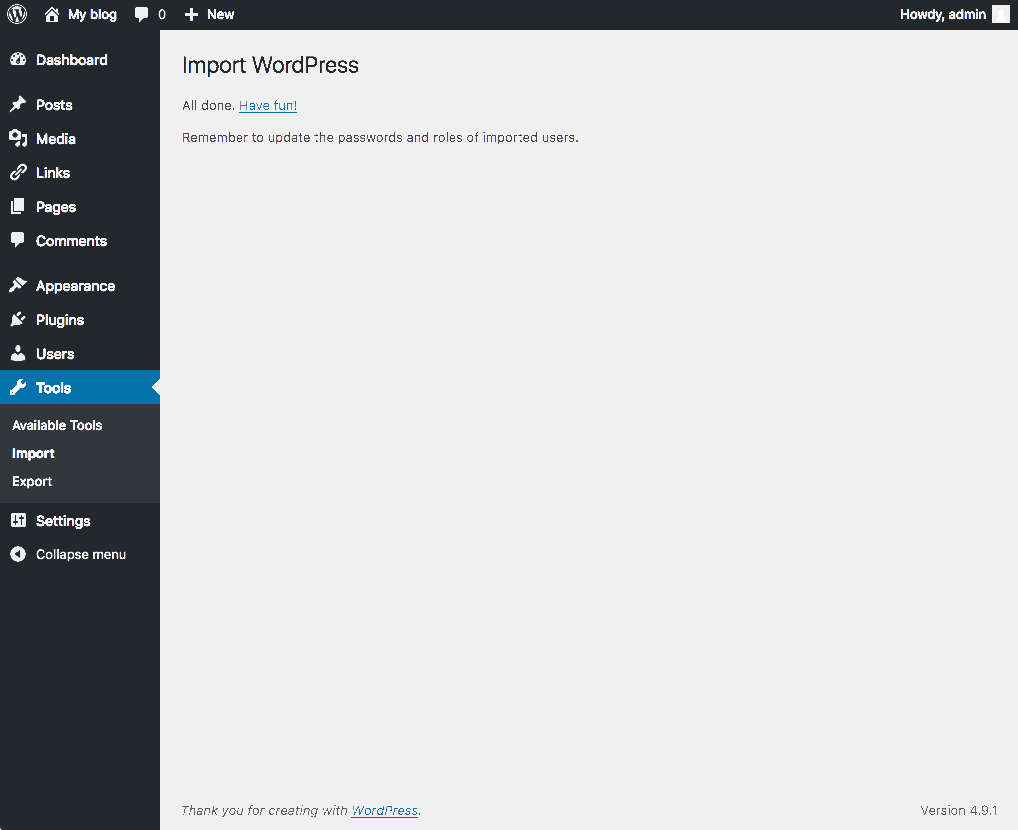
  4. When your import is complete, you will see a confirmation screen.
    Confirmation screen

Your exported content is now added to your site. If you had posts on your site prior to importing, those posts are still available.

Because the export did not include themes or plug-ins, you will need to reinstall those separately from the export/import process.

Choosing Your Domain Name

Choosing your domain name is the first step in getting started with staking your claim on the web. Your domain name is a unique web address (e.g. yourname.school.edu) that can be used to build out your own digital presence. As you make your choice, there are a few considerations to keep in mind:

Your Domain Name Must Be Available: Domain names must be unique, which means in order for you to claim your own, you need to be sure that it is currently available (and not being used by anyone else or any company or organization). There are lots of tools to check on domain availability, and we’ll actually do the checking for you when you sign up for an account. But if you’d rather spend some time thinking about your choice, you can always check domain availability here: whois.com.

Choose a Domain You Can Live With: You should choose a domain name that you feel you can live with for quite some time. You should pick something that you won’t find embarrassing in the future. A good rule of thumb is to pick a domain that you would be comfortable putting on a future job application.

You May Wish to Include Your Name in Your Domain: There is no requirement that your domain reflects your specific identity in the form of your first and last name. However, choosing a domain name that includes your name may make it easier for you to achieve higher rankings in search engines when someone queries your real name.

Pick a Domain you Like: At the end of the day, your domain should reflect you. Pick a domain you like and are proud of. It can reflect your interests, sports you play, or your hobby. Or it could just be your name. The “right” domain for you is the one you’re comfortable with.

File Structures and the File Manager

Web hosting is, at its basic core, files and folders on a computer that is connected to the internet and setup to distribute them. How that computer (typically a server) is set up to do that is covered more in LAMP Environments but this article will explain the idea of the file structure and how it relates to what you view on your domain.

When you signed up for your domain, a web hosting account was created. Although you typically will interact mostly with the web interface to create subdomains, install applications, and other common tasks, you might occasionally also need to work directly with the files in your account. The File Manager in your cPanel is one way to see these files. You can also create an FTP account in cPanel and use an FTP program to interact with these files (FTP stands for File Transfer Protocol, and it’s a way of using a desktop client to transfer files to and from your Web server space).

Let’s take a look at the File Manager built into your cPanel to get a better understanding of the file structure that makes up your website(s).

  1. Login to cPanel with your Sites @ DTCC username and password.
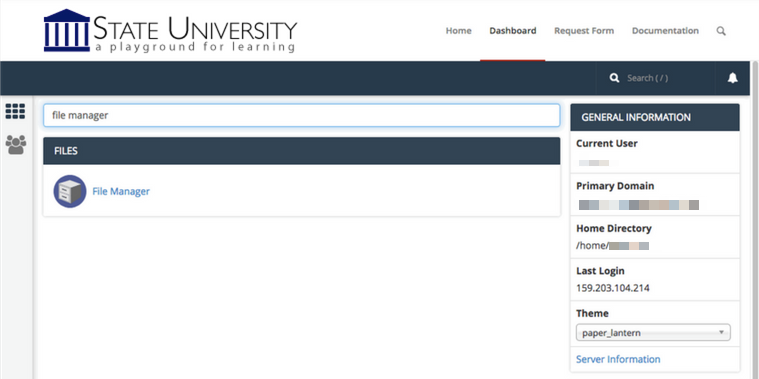
  2. On the homepage of your control panel, you’ll have all the various tools listed. You can easily find the File Manager by using the search tool in the upper righthand corner and typing File Manager. You can also find its icon under Files.
  3. You are now sent to the File Manager and can navigate the folder structure there.

You’ll notice when the File Manager opens up that this looks very much like a folder on your computer. There are a few folders in it as well as files, and you can navigate down into those folders and see what’s inside of them. At the top level of the File Manager, you also have the option of interacting with files and folders you select by moving them around or removing them. There is a larger article all about how to use the file manager at Accessing Your Files through the File Manager so we won’t talk much about how the interface works here. Instead, we’ll cover what those folders and files actually mean and how they relate to what someone sees when they visit your website.

By default, you have a variety of folders at the root of your web space (the first screen you see when you open up the file manager). Some of them are created automatically to store information about the panel and setup of certain sites. These folders are things like access-logs, etc, ssl, and tmp. You can safely ignore most of those folders because they don’t correspond to actual websites. Let’s look at which folders do and how it all works.

Your main domain will correspond with a folder called public_html. Whatever files and folders are inside of this folder are available on that main domain. If you installed WordPress here you’ll likely see a lot of WordPress-related files within it (which were probably helpfully put there by the automated installer). Let’s say we uploaded an image called mypicture.jpg directly into the public_html folder. That image would now be available at yourdomain.com/mypicture.jpg. The slash after your domain implies “this file is inside this folder”. But what if we had a folder inside the public_html folder? How does that appear? This is typically called a subfolder so let’s put a folder in public_html called “images” and put our image, mypicture.jpg, inside of that folder. What would you type in a browser to get to that file now? The location would be mydomain.com/images/mypicture.jpg. So subfolders are also indicated by a forward slash after a domain.

What about subdomains? You can have completely separate sites called subdomains that appear as nameofsubdomain.yourdomain.com. But where are they in the file structure? When you create a subdomain, cPanel will ask you to give the subdomain directory a name. If I had a subdomain called photos.mydomain.com for example, I might want to name the folder “photos” (by default your control panel will call the folder by the name of the subdomain). Folders for subdomains are located inside the public_html folder. So when you go to the File Manager and navigate to public_html, you’ll see folders listed for all of your subdomains and once you navigate inside one of those folders, you’ll see files and folders specifically for that subdomain that appear on the web at that subdomain’s address.

File Manager in cPanel is great to view these files and folders, but it can be limiting if you want to upload an entire folder of information to your website. If you find yourself wanting to do more with the files and folders on your web space you may want to consider using File Transfer Protocol (FTP). FTP will allow you to upload and download files to and from your File Manager (i.e. your website) in bulk. For information on using FTP, click here.