Understanding Accounts & Passwords

One aspect of this web hosting world that users may find a bit complicated at first is understanding the different accounts (and associated passwords) that you can manage as part of your participation. This article outlines the types of accounts that you are likely to have, what they are for, and how you go about resetting passwords on each of them.

Your cPanel Account

When you first sign-up for your domain and hosting, a cPanel account will be generated that provides you with access to your slice of the web server. Your cPanel account is automatically associated with your school NetID username and password. Therefore, your NetID username and password will grant you access to your cPanel account.

Your Application Administrator Accounts

Every time you install a new application in cPanel, an Administrator Account for that application will be created. You will likely use these accounts very often – every time you need to login to your application to manage the associated website, you will use this account.

For example, if you install WordPress to manage your website, every time you need to add content to WordPress, change your theme, approve comments, etc. you will use this account to login.

Usually, you will be given the opportunity to choose the username and password for that account. We recommend choosing something that you are likely to remember but that is strong and secure.

Upon installation, you will likely receive an email confirming the user-id/password combination you chose. It will also have information about how to access the login page for that application. You may wish to make sure you don’t delete this message.

Depending on the application you’re working with, managing and resetting the password for this account will vary. If you’ve used Installatron (in cPanel) to install the application, however, you can always review the account credentials:

  • Log into cPanel
  • Find the application you installed under My Applications.
  • Click the Edit button (this looks like a blue wrench).
  • Scroll down to find the Administrator Username and Password.

In addition, most applications should have some kind of password reset link on the login page. For more information on resetting your application password through Installatron, click here.

Other Types of Accounts

In addition to the account types outlined above, there are a few other kinds of accounts you may have as part of this project:

  • When you sign up for subdomain/top-level domain, cPanel will automatically create an FTP account for you by default. You’ll also have the option of manually creating your own FTP account.
  • Application User Accounts: In addition to the Administrator Account that you set up when installing an application, most applications will also let you set up user profile accounts within each application.

Plugins

WordPress has a lot of functionality built-in, but occasionally you might find a specific need that isn’t a part of the default software. To accomplish this, WordPress has a plugin architecture where developers can create plugins that add additional functionality to your site. From simple photo galleries to site statistics, to automatic Twitter and Facebook sharing of posts, there is practically a plugin for whatever you need for your blog (over 54,000 at the time of this writing). To start using and installing plugins just follow these simple instructions:

  1. Log in to your WordPress dashboard.
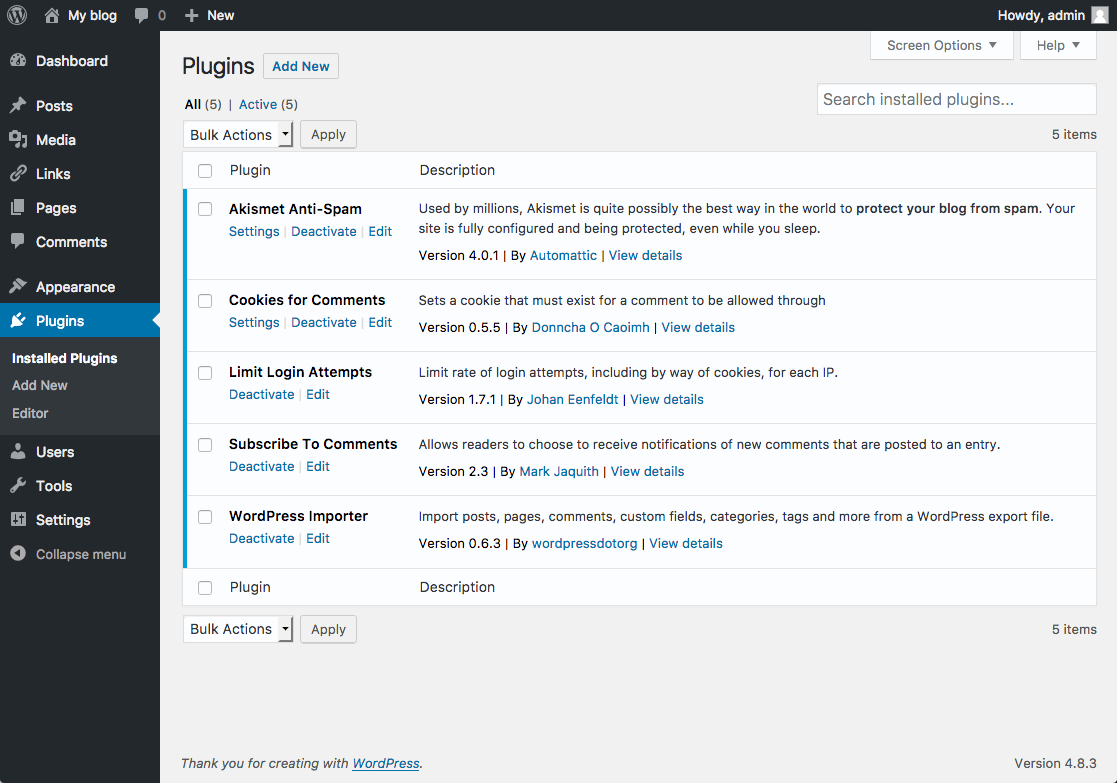
  2. From the left side menu, locate and click plugins.screen shot of plugin menu
  3. You will be given a list of all your currently installed plugins. From this menu, you are able to activate and disable specified plugins by using either the single plugin options located under each plugin name. Or you may use the bulk action drop down menu to simultaneously activate/disable multiple plugins by checking desired plugins. Additionally, you may also sort through installed plugins using the sorting options above the bulk action menu.
     
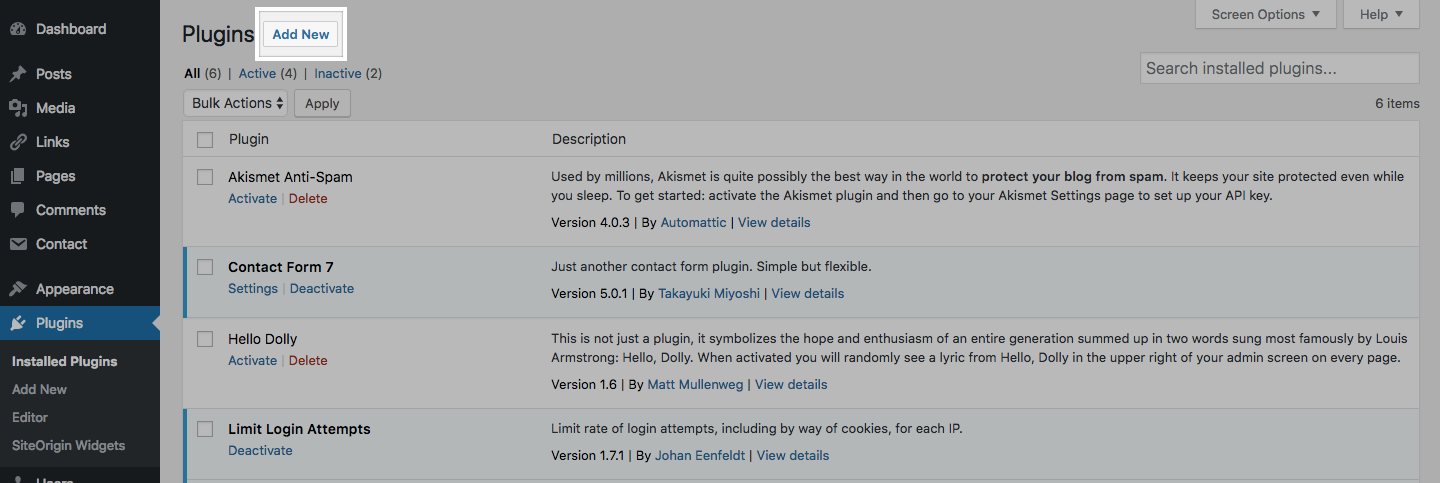
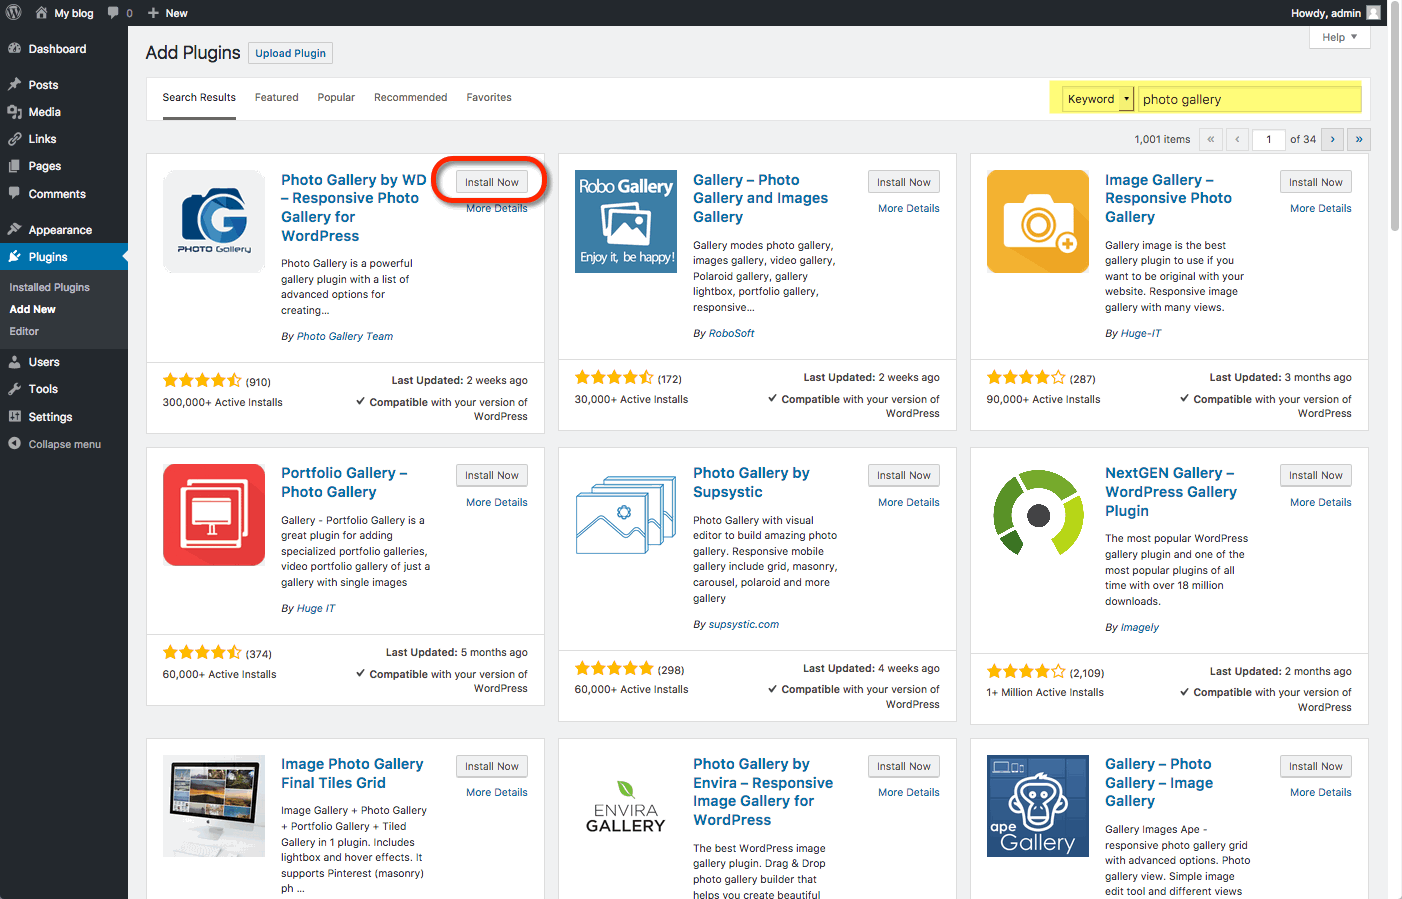
  4. To install a new plugin click add new either from the plugin sidebar or the main plugin menu, you will then be redirected to a search engine where you can search using general or specific terms to find plugins. For example, searching “photo gallery” brings up various plugins from different developers.

    Once you find your desired plugin to install it hit install now, which will automatically install the plugin and prompt you if you would like to activate it now or return to the menu.find and install desired new plugins

After installing your plugin be sure to visit the developers’ website if you have any additional questions about how the plugin works, as some plugins may require certain codes or other actions to be used properly.

Some plugins will have their own settings page located under the settings or tools categories, other plugins will break out their own menu item on the lefthand side of the dashboard. Sometimes it won’t be explicit how the plugin interacts with your personal site, so it’s important to make sure you’ve read the documentation available on the plugin’s website.

Setting Up FTP

There may be times when you need to upload files to your website in the Delaware Technical Community College web hosting environment. There are a number of scenarios when this might be necessary:

  • You’re working with an application that allows you to install plugins/extensions, but the files need to be manually added to your file manager in order to install them. (Note: This is not required for WordPress which allows you to install themes/plugins through the WordPress dashboard.)
  • You’ve developed a custom site/pages using a Web design program, and you need to upload the files you created to your file manager
  • You’re installing an application that isn’t part of applications list in Installatron.

One way to upload files is by using the File Manager that is part of cPanel. However, sometimes you’ll find it easier/necessary to use File Transfer Protocol (FTP) to move files to your site. This can be particularly useful if you’re working with a Web space where you’re not the owner (so you don’t have access to the File Manager in cPanel) or if you need to provide file access to someone else to your space on the Web server. File Manager also only allows you to upload files one by one, so if you’re working with large amounts of data then FTP will be preferable.

What exactly is FTP?

File Transfer Protocol is a method that allows you to remotely move files to a Web server from another location – usually your local/personal computer. Using a pre-defined FTP account (with a username and password), you can configure an FTP client (a program you run on your computer that allows you to transfer files via FTP.

There are lots of FTP clients that you can use; some are free and some are not. A few free ones you might consider:

For the purpose of this tutorial, we’ll show you how to set up FTP in FileZilla, (Cyberduck instructions can be found here) but you should be able to generalize these instructions to use in any FTP client.

Get Information about Your FTP Account

If you’re connecting via FTP to your own space on Delaware Technical Community College, or if you’re setting up an FTP account for someone else to use, you’ll need to start by getting the proper FTP credentials from cPanel:

  1. Login to sites.dtcc.edu.
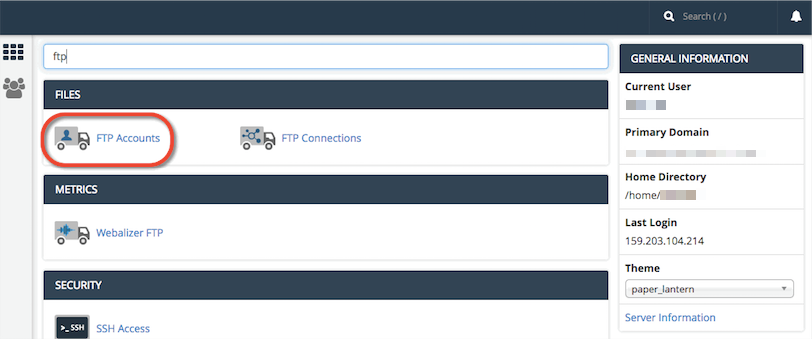
  2. In the Search Box at the top of the page, search for “FTP”, and click the FTP Accounts icon that appears.
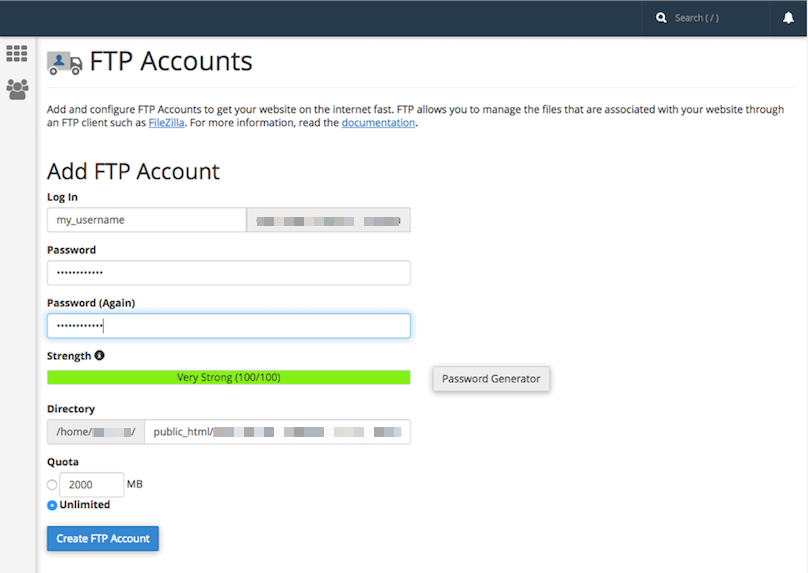
  3. Every cPanel has an FTP account by default, and you can find those credentials by scrolling down on the FTP Accounts page. You also have the option to create a new FTP account, which can be done by filling out the Add FTP Account form with a username and password. Unless you change it, the new FTP account will be limited to a directory with the same name as the account you’re creating. You can change this to a different directory, if you want to grant this account access to a different location.  NOTE: Make sure you know/remember the password you enter. When you’re done, click Create FTP Account.
  4. Once you’ve created the new account, you’ll see it appear in the list at the bottom of the FTP Accounts page. In addition to any accounts you’ve created, in the Special FTP Accounts section, you’ll see the default FTP Account. You’ll know this account because the username corresponds to your cPanel username. This FTP account has full privileges to access all directories within your cPanel.
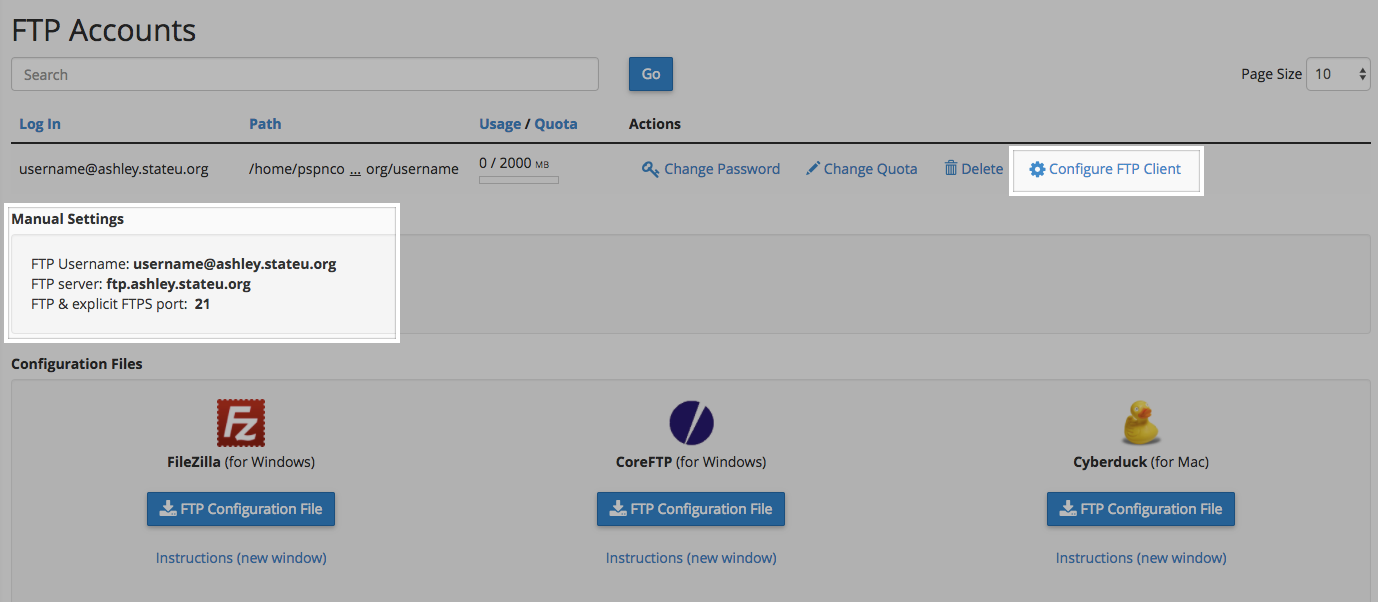
  5. For whichever account you need credentials for, click the Configure FTP Client link.
  6. Write down the username, server, and port information that appears. You will need to use this (or you will need to provide this to the person you are giving FTP access) along with the password you created in Step 3 in order to configure your FTP client.

PLEASE NOTE:

For cPanel’s default FTP account, use the following settings:

-Connect via SFTP (more secure than FTP)
-Port: 22

For an FTP account that you manually created (shown in Step 3 above), use the following settings:

-Connect via FTP (cPanel doesn’t allow an SFTP connection for manual accounts)
-Port: 21

Configure FTP in Your FTP Client

Below are links to tutorials for setting up both FileZilla and CyberDuck to connect to your FTP account.

For further assistance on FTP, read this guide.

Signing Up

Review the Guidelines

Before you get started, we recommend that you review our information about Choosing a Domain Name.

The Sign-Up Process

Once you’ve reviewed the guidelines, you can proceed to the sign-up page.

  1. Click the “Get Started” Button
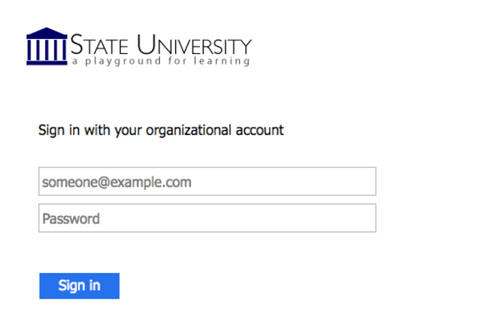
  2. You will be redirected to login for verification. You will use your Sites @ DTCC username and password to log in.
  3. You are now ready to create a domain. To start, you must first sign up for a free subdomain (i.e. yoursite.sites.dtcc.edu). Directions for purchasing a Top Level Domain (i.e. yourdomain.com) will be provided further down.

Option 1: Free Subdomain

For no cost, you can create a subdomain of sites.dtcc.edu.

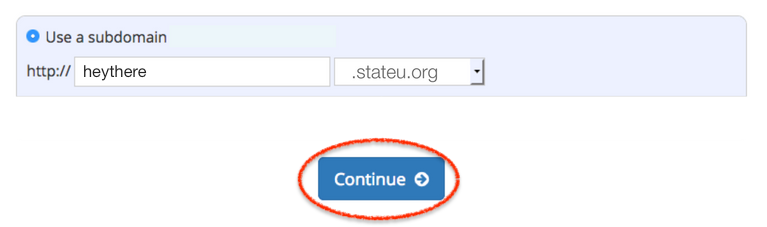
To create a free subdomain of sites.dtcc.edu, leave this default option selected and enter the subdomain name you want for your website. When you’ve found an available subdomain, click the button labeled “Continue.”

Confirm that you like the name you selected. If you do, click the “signup” button. (If not, click the “start over” button, and repeat the above step.)

You should now see a screen confirming that your subdomain is ready. After a few seconds, you will see the regular cPanel options.

Option 2: Buy a top-level domain from Reclaim Hosting

It is easy to create your own top-level domain. This allows you to select a URL for your website that is easy to remember and share.

While you are at Delaware Technical Community College, this is available for a nominal cost (currently $15/year). You can continue to use this domain after leaving Sites @ DTCC, although the cost may increase.

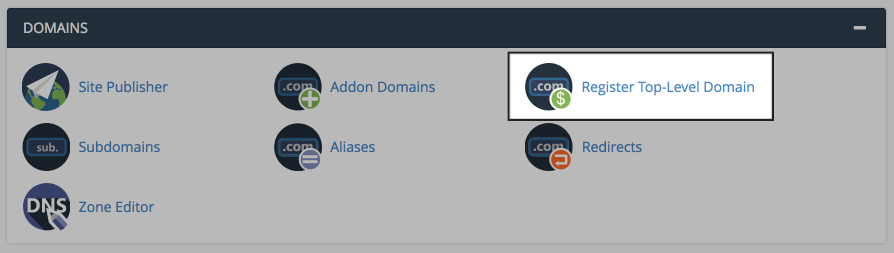
To register a top-level domain log into your newly created cPanel, navigate to the Domains section, and click Register Top-Level Domain.

This panel offers a step-by-step guide to registering and adding a new top-level domain to your new cPanel account.

Option 3: Connect an existing domain to your cPanel

If you already have an existing domain that you’ve previously registered elsewhere, simply point your domain’s nameservers to ns1.reclaimhosting.com and ns2.reclaimhosting.com.

WordPress Export/Import

If you are using your WordPress, you can also get an export of your posts, pages, comments, custom fields, categories, and tags.

The WordPress export is great for grabbing the content of your WordPress site so that you can import it into another WordPress host, such as WordPress.com or WordPress.org.

Note: Exports do not include plug-ins, or other site customizations.

Exporting

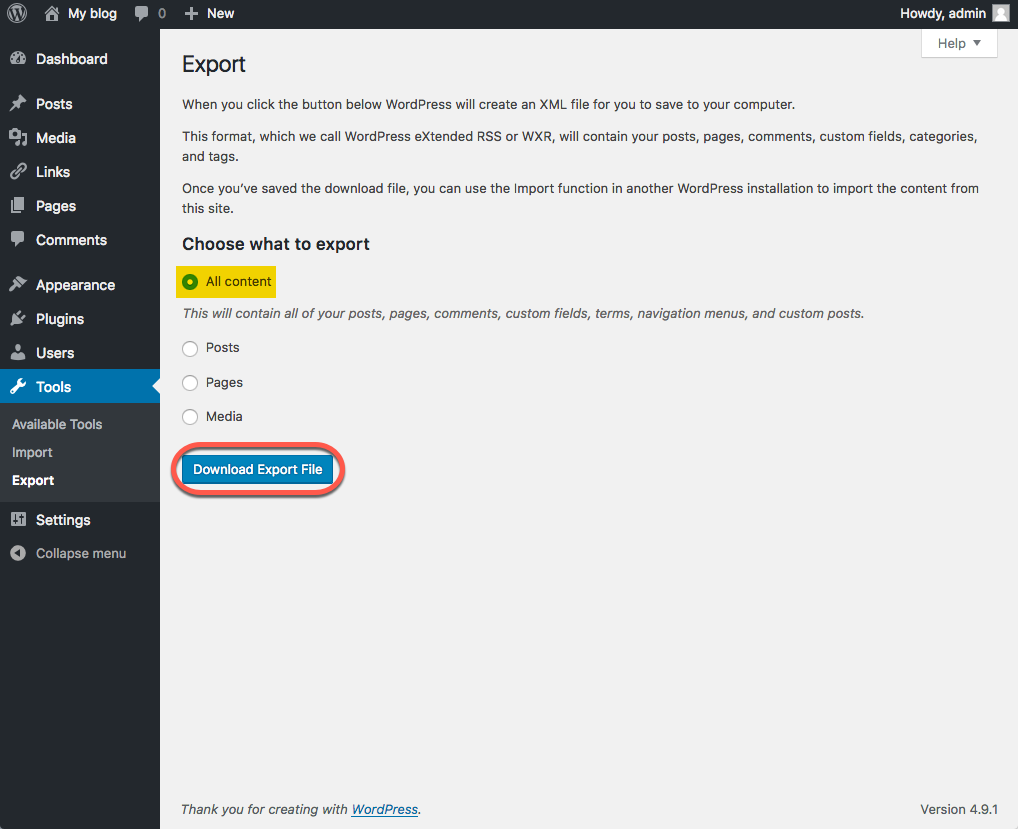
  1. From the Dashboard navigate to Tools>Export
    The screenshot below shows how to export all of your posts, pages, comments, custom fields, terms, navigation menus, and custom posts. However, you can also export just certain posts, pages, or media. The export page within WordPress

This export process generates an XML file of your blog’s content. WordPress calls this an  eXtended RSS or WXR file.

Note: This will ONLY export your posts, pages, comments, categories, and tags; uploads and images may need to be manually transferred to the new blog. If possible, do not delete your blog until after media files have successfully been imported into the new blog.

Importing

Once you have exported your posts, pages, etc., you can import them into your new WordPress site.

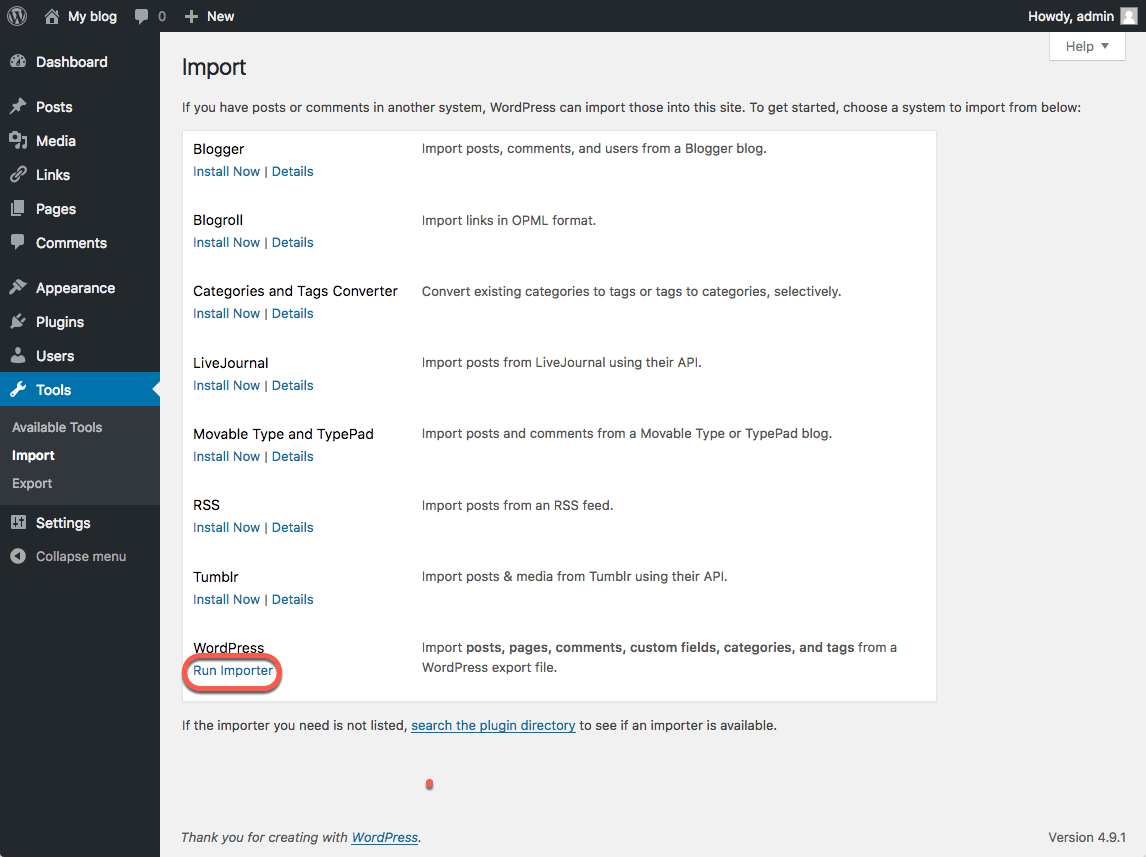
  1. Login to your new WordPress.com or self-hosted WordPress site and go to the Dashboard.  From there navigate to Tools>Import and click on the link to “Run Importer
    Screenshot showing where to find the WordPress Importer
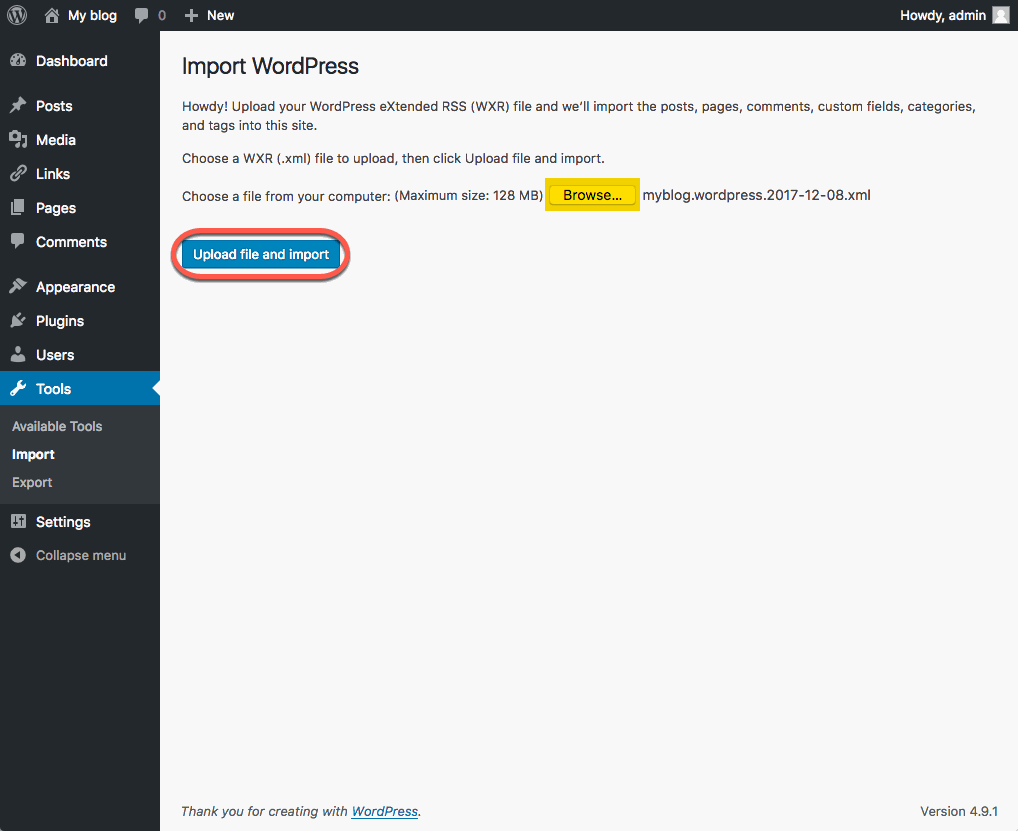
  2.  Next you will see a screen that prompts you to upload the WXR (.xml) file you generated through the export process. Browse to your exported WordPress archive and then click the “Upload file and import” button.
    Upload file and import
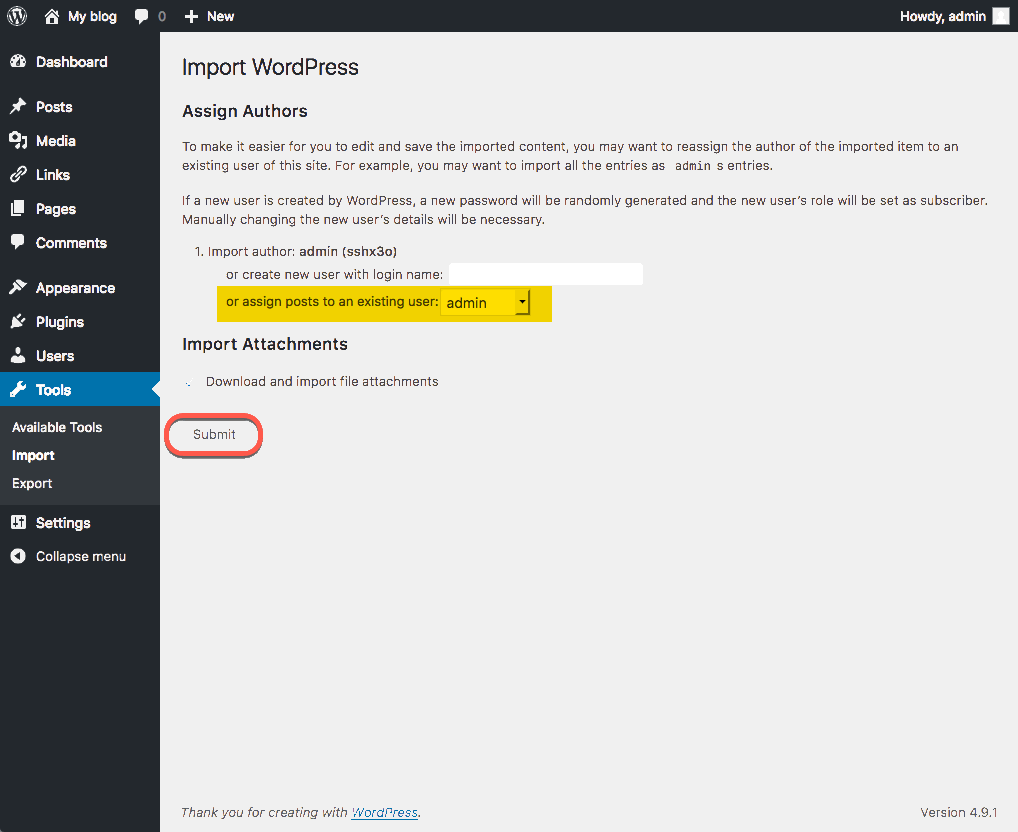
  3. Choose and upload your file.  You will then be prompted to assign an author to the posts that you are importing.  You can use this function to assign one author to all posts, or you can manually set the author for each post in the posts menu. Unless you have a space limit, you will also want to select the option to “download and import file attachments” before clicking the “Submit” button.
    Select desired import options and click the
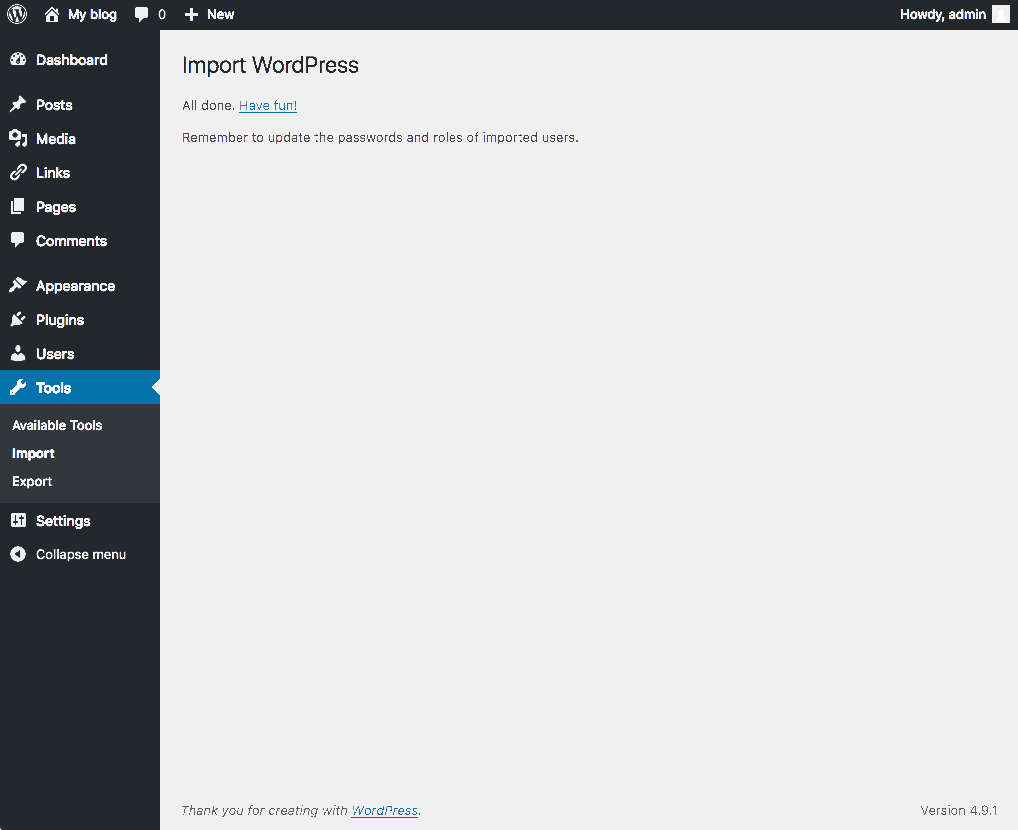
  4. When your import is complete, you will see a confirmation screen.
    Confirmation screen

Your exported content is now added to your site. If you had posts on your site prior to importing, those posts are still available.

Because the export did not include themes or plug-ins, you will need to reinstall those separately from the export/import process.

Choosing Your Domain Name

Choosing your domain name is the first step in getting started with staking your claim on the web. Your domain name is a unique web address (e.g. yourname.school.edu) that can be used to build out your own digital presence. As you make your choice, there are a few considerations to keep in mind:

Your Domain Name Must Be Available: Domain names must be unique, which means in order for you to claim your own, you need to be sure that it is currently available (and not being used by anyone else or any company or organization). There are lots of tools to check on domain availability, and we’ll actually do the checking for you when you sign up for an account. But if you’d rather spend some time thinking about your choice, you can always check domain availability here: whois.com.

Choose a Domain You Can Live With: You should choose a domain name that you feel you can live with for quite some time. You should pick something that you won’t find embarrassing in the future. A good rule of thumb is to pick a domain that you would be comfortable putting on a future job application.

You May Wish to Include Your Name in Your Domain: There is no requirement that your domain reflects your specific identity in the form of your first and last name. However, choosing a domain name that includes your name may make it easier for you to achieve higher rankings in search engines when someone queries your real name.

Pick a Domain you Like: At the end of the day, your domain should reflect you. Pick a domain you like and are proud of. It can reflect your interests, sports you play, or your hobby. Or it could just be your name. The “right” domain for you is the one you’re comfortable with.

File Structures and the File Manager

Web hosting is, at its basic core, files and folders on a computer that is connected to the internet and setup to distribute them. How that computer (typically a server) is set up to do that is covered more in LAMP Environments but this article will explain the idea of the file structure and how it relates to what you view on your domain.

When you signed up for your domain, a web hosting account was created. Although you typically will interact mostly with the web interface to create subdomains, install applications, and other common tasks, you might occasionally also need to work directly with the files in your account. The File Manager in your cPanel is one way to see these files. You can also create an FTP account in cPanel and use an FTP program to interact with these files (FTP stands for File Transfer Protocol, and it’s a way of using a desktop client to transfer files to and from your Web server space).

Let’s take a look at the File Manager built into your cPanel to get a better understanding of the file structure that makes up your website(s).

  1. Login to cPanel with your Sites @ DTCC username and password.
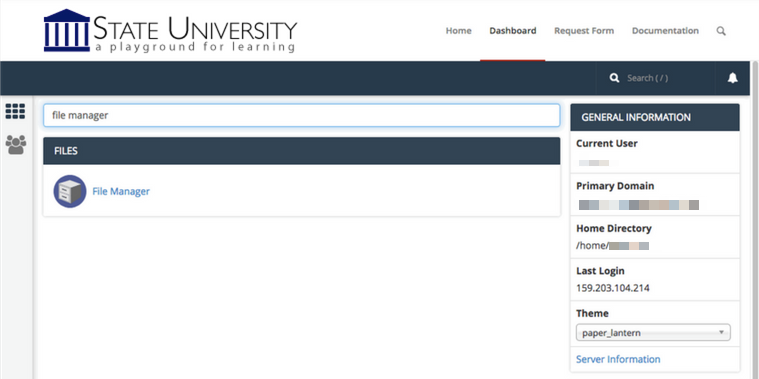
  2. On the homepage of your control panel, you’ll have all the various tools listed. You can easily find the File Manager by using the search tool in the upper righthand corner and typing File Manager. You can also find its icon under Files.
  3. You are now sent to the File Manager and can navigate the folder structure there.

You’ll notice when the File Manager opens up that this looks very much like a folder on your computer. There are a few folders in it as well as files, and you can navigate down into those folders and see what’s inside of them. At the top level of the File Manager, you also have the option of interacting with files and folders you select by moving them around or removing them. There is a larger article all about how to use the file manager at Accessing Your Files through the File Manager so we won’t talk much about how the interface works here. Instead, we’ll cover what those folders and files actually mean and how they relate to what someone sees when they visit your website.

By default, you have a variety of folders at the root of your web space (the first screen you see when you open up the file manager). Some of them are created automatically to store information about the panel and setup of certain sites. These folders are things like access-logs, etc, ssl, and tmp. You can safely ignore most of those folders because they don’t correspond to actual websites. Let’s look at which folders do and how it all works.

Your main domain will correspond with a folder called public_html. Whatever files and folders are inside of this folder are available on that main domain. If you installed WordPress here you’ll likely see a lot of WordPress-related files within it (which were probably helpfully put there by the automated installer). Let’s say we uploaded an image called mypicture.jpg directly into the public_html folder. That image would now be available at yourdomain.com/mypicture.jpg. The slash after your domain implies “this file is inside this folder”. But what if we had a folder inside the public_html folder? How does that appear? This is typically called a subfolder so let’s put a folder in public_html called “images” and put our image, mypicture.jpg, inside of that folder. What would you type in a browser to get to that file now? The location would be mydomain.com/images/mypicture.jpg. So subfolders are also indicated by a forward slash after a domain.

What about subdomains? You can have completely separate sites called subdomains that appear as nameofsubdomain.yourdomain.com. But where are they in the file structure? When you create a subdomain, cPanel will ask you to give the subdomain directory a name. If I had a subdomain called photos.mydomain.com for example, I might want to name the folder “photos” (by default your control panel will call the folder by the name of the subdomain). Folders for subdomains are located inside the public_html folder. So when you go to the File Manager and navigate to public_html, you’ll see folders listed for all of your subdomains and once you navigate inside one of those folders, you’ll see files and folders specifically for that subdomain that appear on the web at that subdomain’s address.

File Manager in cPanel is great to view these files and folders, but it can be limiting if you want to upload an entire folder of information to your website. If you find yourself wanting to do more with the files and folders on your web space you may want to consider using File Transfer Protocol (FTP). FTP will allow you to upload and download files to and from your File Manager (i.e. your website) in bulk. For information on using FTP, click here.

Understanding cPanel

The cPanel, or control panel, is your landing page for Delaware Technical Community College that lets you easily access and manage the files and applications of your account. Once logging into your account, you can see your active domains and personal account information at a glance.

Applications

Delaware Technical Community College has four featured applications listed, but there are many, many more that can be utilized. Just click on All Applications in order to see what possibilities lie in wait for your domain! For more information about web applications, click here.

cPanel section for Application installations

Domains

The Domains section of cPanel allows you to manage your addon domains, subdomains, aliases, and redirected domains. Additionally, you can use the Zone Editor to map different parts of your domain to other hosting environments.

cPanel section for Domain management tools

    • Addon Domains act as second website with its own unique content. Please note, you are required to register the new domain name before you can host it. Reclaim Hosting, our hosting provider, offers a service for this, although there are other domain registration companies if you’d prefer to look elsewhere.
    • Subdomains act as a second website with its own unique content without having to register a new domain name. In general, you use your existing domain name and change the www to another relevant term. For example, student.sites.dtcc.edu is a subdomain of sites.dtcc.edu.
    • Redirects map old domains to your existing domain.
    • Aliases allow you to create additional domain names to be mapped to the current domain.
    • Zone Editor handles DNS (Domain Name System) and allows you to see what’s happening behind the scenes when someone visits your website. For more information, see the “What is DNS?” section of this documentation.

Files

Within files, you are able to manage and organize all the files on your domain. To truly see the capabilities of these tools – just click and explore!

cPanel section for File management tools

    • File Manager allows you to manage all files connected to your account, including renaming, uploading, and deleting them. You can also get to your file manager using the Quick Links section at the top left of your cPanel.
    • Images lets your manage images that have been previously saved to your account.
    • Directory Privacy allows you to set a password to protect certain directories of your account.
    • Disk Usage helps you monitor your account’s available space.
    • File Transfer Protocol (FTP) is a fast and convenient way to transfer large files online. More information can be found in the “Setting up FTP” section of this documentation.
    • R1Soft Restore Backups is the recommended backup option of the three backup icons displayed. You can read more about it under the “Automated Offsite Backups” section of Reclaim’s blog post “Backups Done Right”.

Databases

The Databases section allows you to create MySQL and PostgreSQL databases and users, and to modify and access to them. SQL stands for Structured Query Language. SQL is an international standard in querying and retrieving information from databases. PostgreSQL is an object-relational database management system.

cPanel section for Database management tools

    • phpMyAdmin: manages a single database as well as a whole MySQL server.
    • MySQL Database & MySQL Database Wizard: allows you to store and manage large amounts of information over the web; these are essential to running web-based applications, for example: bulletin boards, content management systems, and online shopping carts. The Wizard guides you through the setup of a MySQL database and user privileges.
    • Remote MySQL: You can use this to add a specific domain name so visitors can connect to your MySQL databases.

Metrics

cPanel offers a number of different monitoring and statistic tools to help you administer your hosting account. Some of the more important and useful functions are explained in more depth below.

cPanel section for Metric tools

    • Visitors: Use this to see your 1,000 most recent visitors for each of your domains.
    • Errors: This displays the last 300 errors on your site; helpful if looking for missing files or broken links.
    • Bandwidth: Bandwidth represents the amount of information that your server transfers and receives. Use this function to view the bandwidth usage for your site; see total usage, or by month. Includes web and mail usage.
    • Raw Access: This is another stats function that allows you to see who has visited your website without graphics. A downloadable zip file of your site’s activity is availble.
    • Awstats: Allows you to see your website visitors with visual aides.
    • CPU and Concurrent Connection Usage: Lets you visualize the CPU and RAM usage of your site.

Security

cPanel has an entire security section devoted to protecting different parts of customer web sites from the unauthorized access of their viewers. The cPanel Security section includes SSH Access, IP Blocker, SSL/TLS, Hotlink Protection, Leech Protection and ModSecurity.

cPanel section for Security tools

    • SSH Access: Allows secure file transfers and remote logins online. Watch a video on how to manage SSH Keys on Reclaim Hosting.
    • IP Blocker: This function allows you to block a range of IP addresses to prevent them from accessing your website. This is done by simply searching a qualified domain name.
    • SSL/TLS: The SSL/TLS Manager will allow you to generate SSL certificates, certificate signing requests, and private keys. These are all parts of using SSL to secure your website. Information is sent encrypted instead of in plain text.
    • Hotlink Protection: Prevents other websites from directly linking to files on your website.
    • Leech Protection: Prevents your users from giving out or publicly posting their passwords to a restricted area of your site
    • ModSecurity: Protects your website from various attacks using a web application firewall, provides additional tools to monitor your Apache web server.
    • SSL/TLS Status: Allows you to view, upgrade, or renew your Secure Sockets Layer (SSL) certificates.

Software

The Software section of cPanel is located towards the bottom of your cPanel dashboard. The functions that get used most often in this category are Optimize Website and the Installatron Applications InstallercPanel section for Software

    • Optimize Website: This function allows you to optimize the performance of your website by tweaking the way Apache handles requests
    • Installatron Applications Installer: Another route to the “View More” in Web Applications, which lists all available features that can be installed on your domain.

Advanced

The Advanced Section is located at near the very end of your cPanel dashboard. We recommend using this area only if you are familiar and comfortable with utilizing these features.

cPanel section for Advanced tools

    • Track DNS: this allows you to find out information about any domain; trace the route from the server to your computer, for example. This can be helpful to make sure your DNS is set up properly.
    • Indexes: This manager customizes the way a directory can be seen (or not seen) online.
    • Error Pages: In two simple steps, you can select the domain you wish to work with, and then create/edit error pages for that site that viewers will see.
    • Virus Scanner: is essentially what it sounds like; start a new virus scan in Mail, Entire Home Directory, Public Web Space or Public FTP space.

Preferences

The Preferences area allows you to change your language, change the style of the interface, and your contact information. While we recommend that you leave your primary contact email as your school email address, you are more than welcome to add a second! Further, within Contact Information, you can update your notification preferences.


cPanel section for Preferences

    • Password & Security: allows you to change your cPanel password. (Needed for FTP connection, for example)
    • Change Language: This tool allows you to change the language used in your cPanel Dashboard.
    • Change Style: Use this tool to customize your cPanel interface; choose between Basic and Retrothemes.
    • User Manager: Find how to use User Manager here

Accessing Your Files through the File Manager

Your Delaware Technical Community College cPanel includes a File Manager that allows you to interact directly with the files stored in your web hosting account. This can be useful if you want to upload software that cannot be automatically installed via the Web Applications section of your cPanel, if you need to change the name or permissions of a file or group or files, or if you want to edit a plain text file. To access your files via the File Manager, use these steps:

  1. Login to sites.dtcc.edu with your Sites @ DTCC username and password.
  2. Once logged in, you’ll be on the homepage of your cPanel. The easiest way to navigate your cPanel is by utilizing the search bar in the top right panel. Search File Manager. When you press enter, you will be automatically redirected to the File Manager.  You can also find the File Manager icon under the Files section.
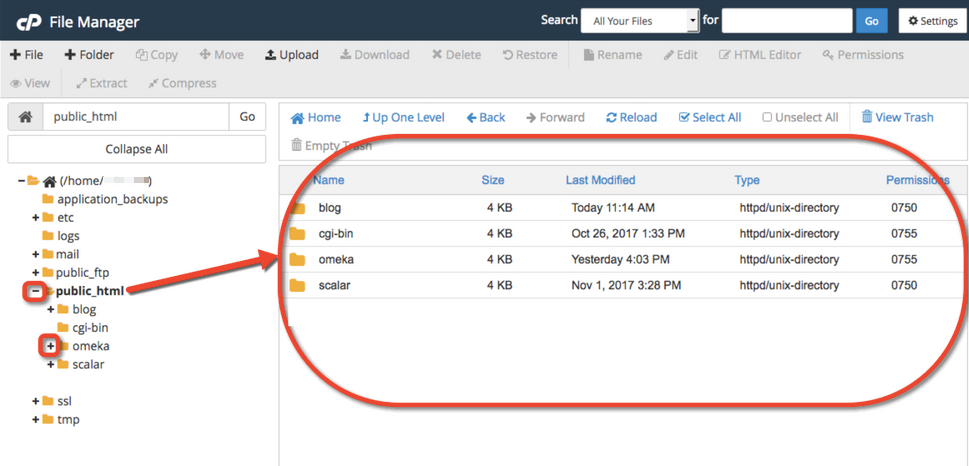
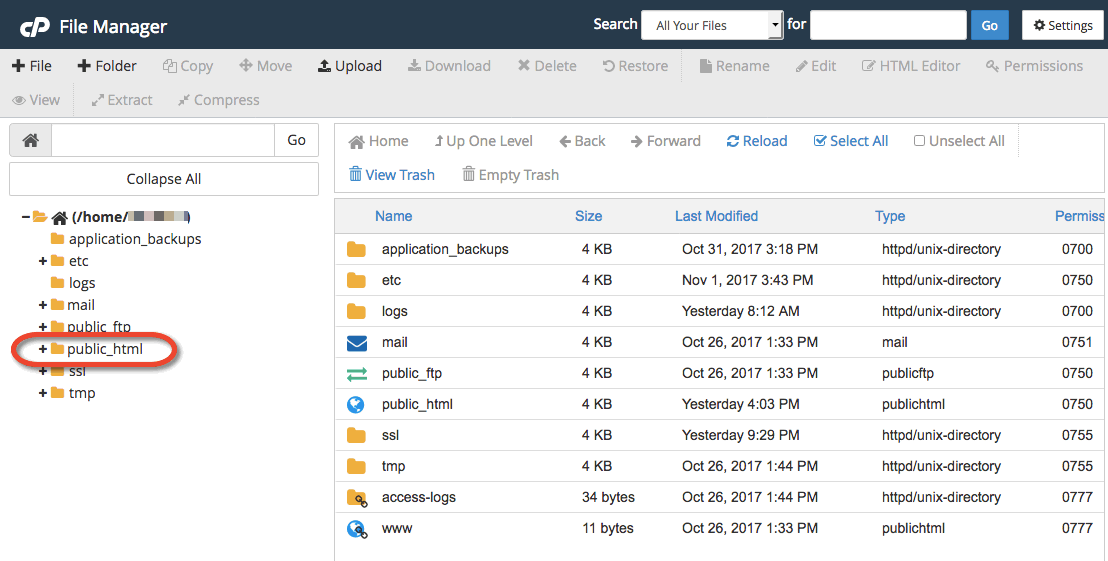
  3. On the left side of the “File Manager” window, you’ll see a navigation menu containing the file structure of your web hosting account. More information about the contents of these files and folders can be found in the File Structures and the File Manager documentation article.
  4. In the navigation menu, choose the public_html directory. This will take you directly to the folder that contains the files associated with your website(s). You’ll notice your current location (the public_html folder) is bolded and highlighted in this menu. Click the [+] (expand) icon next to a folder to see what subfolders it contains, or click on the name of the folder to view all of its contents in the file browser on the right side of the page. You can also navigate through the folders in your account by double-clicking on them in the menu on the left side of your file manager.
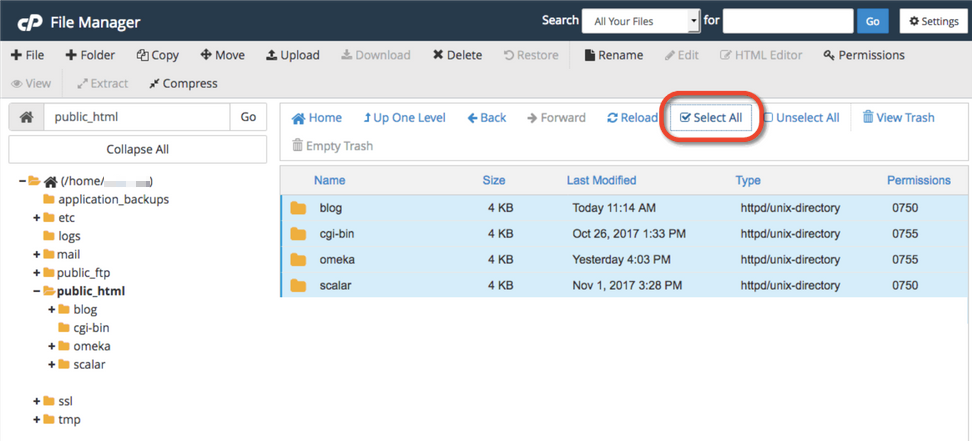
  5. To select an item, click once on its icon in the file browser. You can also use the “Select All” button above the file browser, or your computer’s keyboard shortcuts (Shift, Command, Control, etc), to select multiple items from this list.
  6. Depending on what you have selected, different options will be available to you in the action menu across the top of your file manager. For example, if you have selected a folder, you can rename it or Change Permissions on it.
    screen shot of file manager tools
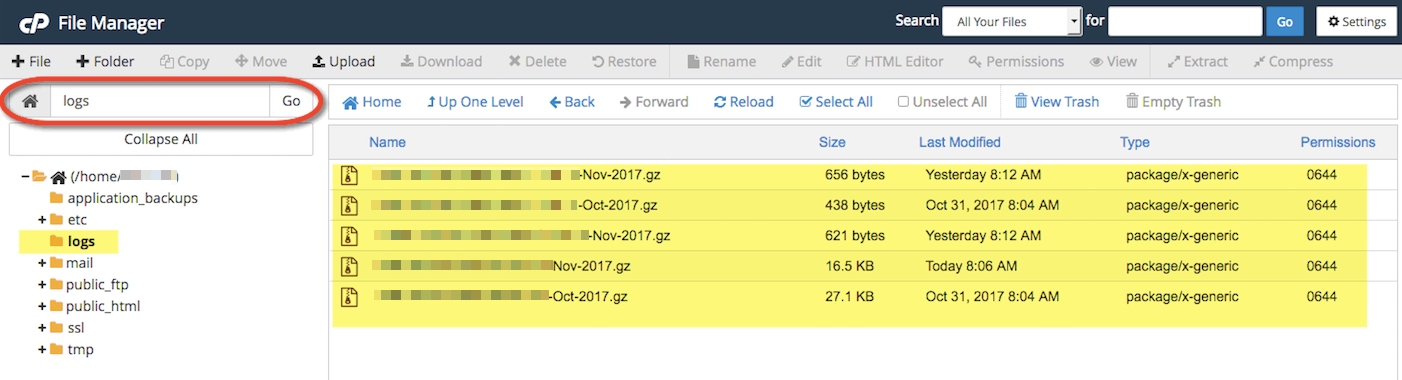
  7. If you know exactly what location you want to skip to within your web hosting account, you can type it into the box directly above the navigation menu and click Go.
  8. Alternatively, if you know the exact name of the file or folder you are looking for, but not its location, you can use the Search box to find it.screen shot to find file by name

Getting Started

This web hosting space provides students, faculty, and staff with the opportunity to sign up for a domain name and create a digital presence through various mediums such as blogs, portfolios, and wikis. You can easily install open source applications such as WordPress, Drupal, Scalar, and Omeka to your own domain, and use this space to create your digital identity and express your creativity.